By: Team F11-1 Since: March 2020 Licence: MIT
Table of Contents:
- 1. Introduction
- 2. Additional Information
- 3. Quick Start
- 4. Interpreting Calgo’s Graphical User Interface
- 5. Commands
- 5.1.
clear: Clearing all entries - 5.2.
delete: Deleting aFoodfrom currentFood Record - 5.3.
exit: Closing Calgo - 5.4.
export: Exporting the currentFood Recordinto a reference sheet - 5.5.
find: Finding aFoodentry by nutritional value or keyword(s) - 5.6.
goal: Setting a daily calorie target - 5.7.
help: Displayinghelpwhen lost - 5.8.
list: Listing allFoodin currentFood Record - 5.9.
nom: AddingFoodtoConsumption Record - 5.10.
report: Generating key statistics and insights - 5.11.
stomach: Showing allFoodconsumed on a particular day - 5.12.
update: Updating Calgo’sFood Record - 5.13.
vomit: Removing portions ofFoodfromConsumption Record
- 5.1.
- 6. FAQ
- 7. Glossary
- 8. Command Summary
1. Introduction
Do you want to live a healthy lifestyle, yet never manage to reach the stage where you are able to actively track your diet?
Is it because managing the nutritional information of your meals is just too time-consuming and frustrating?
Are you searching for ways to make the meal tracking process much more convenient so that you can save all of that time and memory for the many other aspects of your life? Search no more because we have the solution for you.
Introducing Calgo, your new personal meal-tracking assistant!
Calgo is an all-in-one smart calorie tracker that helps you to always be one step ahead in your fitness goals!
Here are a few ways in which Calgo can help you:
-
Data Management: Store and organise of all your favourite
Foodentries at your fingertips. -
Insights: Set your personal diet goals and Calgo helps you to achieve them by providing you with consumption reports, a graphical summary and insights on how to improve your diet.
-
Hassle-Free Convenience: Generate a portable copy of your
Food Recordor personalised consumption reports with a single command anytime, anywhere. -
User-Friendly Software Interface: Optimise your meal-tracking experience with features that tolerate incomplete search inputs, produce fast responses and suggestions.
-
Performance: Enjoy a smooth and fast workflow, powered by a combination of a robust Command Line Interface (CLI) and an objectively clear Graphical User Interface (GUI).
As you can see, Calgo’s features are optimised for you to build healthy eating habits and learn how to keep track of your diet.
2. Additional Information
Before continuing, it may be helpful to familiarise yourself with a few symbols that you will encounter in this User Guide:
| This provides you with additional information that should be taken note of. |
| This informs you of useful tips about Calgo. |
Also, as you may be wondering from the previous section, any words that are marked up in this format: This is an example refer to technical terms related to Calgo’s implementation.
Check out the list below on how to use this User Guide.
-
If you are a first-time user, start from here for instructions for downloading and setting up Calgo.
-
If you are unsure of the GUI of Calgo, start from here to learn what each component of the App is.
-
If you are interested to learn about the various features Calgo has, check out the Commands section here.
-
If you are already familiar with Calgo, but need a slight refresher, check out the Command Summary section here.
3. Quick Start
-
Ensure you have Java
11or above installed in your Computer. -
Download the latest application file named
calgo.jarover here. -
Copy the
.jarfile to a folder which you will use as the home folder for the Calgo application. This is where all of your consumption data will be stored as well. -
Double-click the
.jarfile to start the App. The GUI should appear in a few seconds, similar to what is shown in Figure 3.1.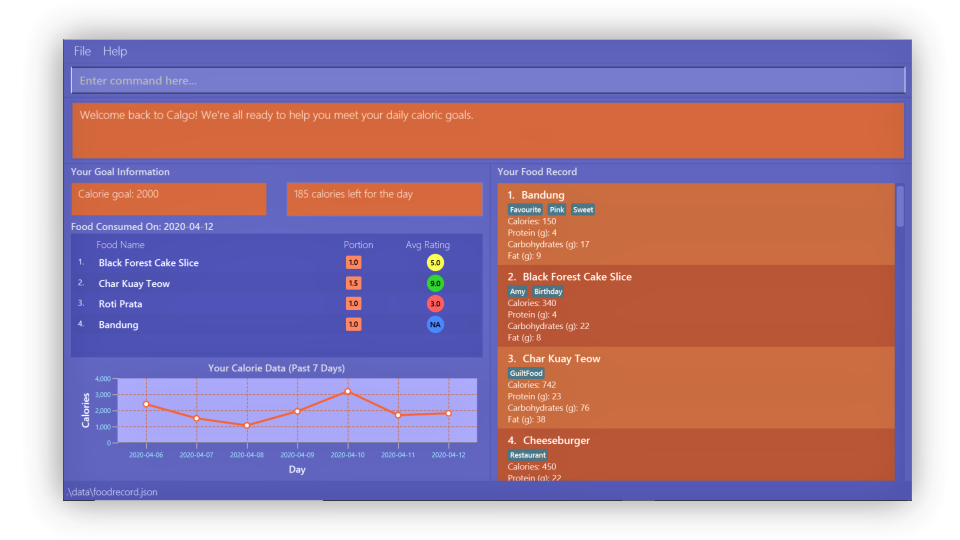 Figure 3.1: An illustration of Calgo on startup
 -
To verify that Calgo is working for you, type your desired command in the command box and press enter to execute it.
Example: Typehelpand press enter to open theHelp Window, which should look like this: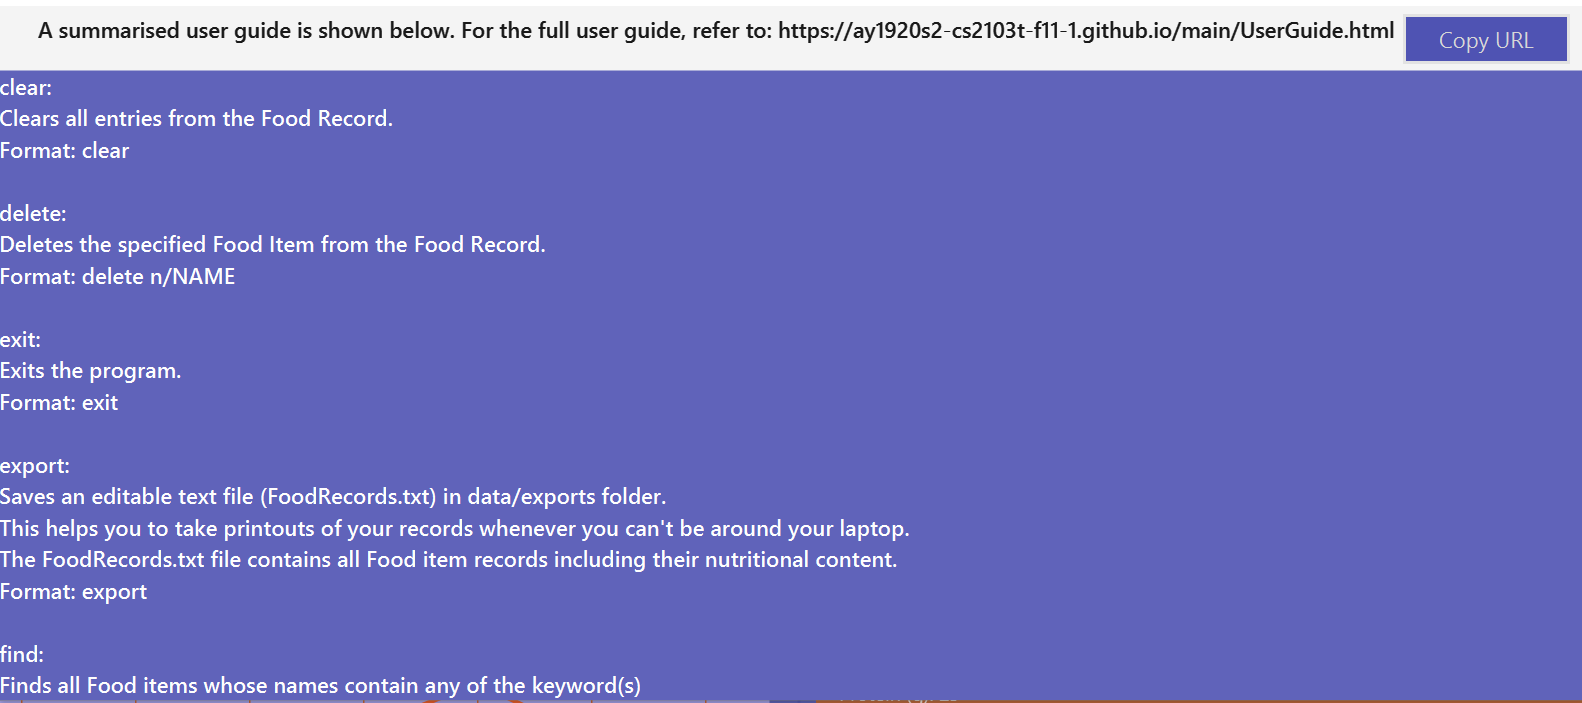 Figure 3.2: A screenshot of Calgo’s Help Window
 -
Now that Calgo is working perfectly fine, what are you waiting for? Your healthy lifestyle begins now!
Start experimenting with the commands yourself and experience the convenience Calgo brings.-
Learn specific details about the various commands Calgo offers by referring to this section.
-
If you need a complete summary of all commands, refer to this table.
-
4. Interpreting Calgo’s Graphical User Interface
(by Janice)
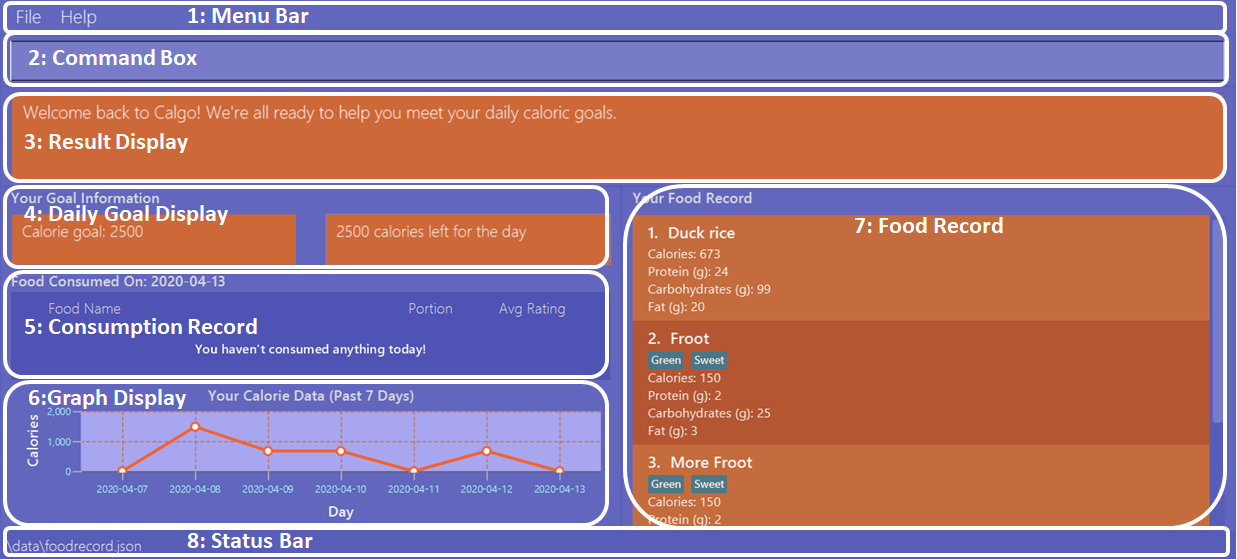
Calgo’s GUI is designed to be sleek and compact, allowing you to use and view all of Calgo’s features on a single window. However, that might be a little overwhelming at the start. Hence, this section aims to give a rundown on the GUI’s various parts and ease you into using the App, starting from the top of the GUI shown in the above diagram.
These sections are labelled from 1 to 8, in the following order:
-
Menu Bar -
Command Box -
Result Display -
Daily Goal Display -
Consumption Record -
Graph Display -
Food Record -
Status Bar
There is a ninth part, the Help Window, that is a separate pop up - only appearing when required for your convenience.
4.1. Menu Bar
The bar has two buttons, File and Help. The buttons allow
you to exit the App by clicking the exit option under File, and to access the command guide by clicking the
help option under Help. These buttons are there for your convenience, as exiting the app can also be done through the
exit command. Likewise, accessing the command guides can be done using the help command.
4.2. Command Box
Calgo listens to your requests and processes them. The Command Box is where you type commands into.
Should you mistype a command, Calgo will prompt you to use the right format. You can easily edit the wrong command
inside the Command Box without needing to retype it entirely.
4.3. Result Display
This is where Calgo displays textual updates as a result of processing your inputted commands. The Result Display will
always show a response so you will know whether your commands have been correctly processed.
4.4. Daily Goal Consumption
This section is labelled "Your Goal Information" on the GUI, and consists of two parts. The left box
displays your target daily calorie goal (after you’ve set it using the goal command). The right box shows
the amount of calories you still need to consume to meet your daily goal, or the amount you’ve exceeded by.
The Daily Goal Consumption updates automatically.
4.5. Consumption Record
The Consumption Record displays the list of Food entries that you have consumed on that day. Although it only shows
one day’s consumption, the stomach command lets you view other days' records.
It has three subsections:
-
The name of the
Foodentry. -
The number of portions of the
Foodyou consumed that day. -
The average rating as set by you, color-coded from red to green for low to high rating.
4.6. Graph Display
This section contains a graph that shows a summary of your past seven day’s total calorie consumption. It displays data
starting from the date of the current Consumption Record.
Example: Consumption Record currently shows 2020-04-12. Graph Display will thus show the daily calories consumed from
2020-04-06 to 2020-04-12.
4.7. Food Record
This is a list of all Food entries you currently have in Calgo. Each Food entry will have a name, its nutritional
information, and optional tags as set by you. The Food Record alternates colors between entries so that you
can easily tell one entry apart from its neighbours.
4.8. Status Bar
This bar shows where Calgo reads system data from. You should not delete or modify these files.
5. Commands
In this section, specific information about each command will be explained. This includes the purpose of each command, how it is formatted and visual examples of its usage.
Before we begin, do take note of the following information which applies to all Calgo commands:
Command Format Information
-
Words in
UPPER_CASEare parameters that you should provide.-
Example: In
n/NAME,NAMEis a parameter.n/kiwiwould mean that the name of theFoodis 'kiwi'.
-
-
Parameters in square brackets (i.e. []) are optional.
-
Example: In
[t/TAG],TAGis an optional parameter which can be used ast/fruitto tag theFoodas a 'fruit'.
-
-
Parameters can be given in any order, as long as the correct prefix appears before the parameter.
-
Example: If a command specifies
n/NAME p/PROTEIN, then enteringp/PROTEIN n/NAMEalso gives the same functionality.
-
-
Parameters with ellipses (
…) after them can be used zero or more times.-
Example: For
[t/TAG]…the following are valid:-
Leaving the parameter empty.
-
Typing
t/favouritewith one tag. -
Typing
t/favourite t/greenwith two tags. -
Typing with more than 2 tags.
-
-
As you key in the name of the Food for any of the following commands: update, delete, or nom, the Result Display
will show suggestions for Food entries based on what you have typed.
Never make spelling mistakes again!
|
The following subsections will elaborate on the specific details of Calgo commands.
5.1. clear : Clearing all entries
(by Vineeth)
If you want to clear all the Food entries currently stored in your Food Record, this command will be useful to you.
The data in your Consumption Record and Graph Display will not be affected from executing the clear command.
|
To cater to fast typists who are more likely to make typing mistakes, Calgo will still execute this command even if there are
other parameters or words that are typed after clear. |
Format: clear
Example:
Suppose that you want to drastically improve your diet. You decide to take a look at all of your Food entries
currently in the Food Record but realise none of them fit into your new diet.
To avoid the hassle of deleting each Food entry one by one, you decide to clear them. This is what you need to do:
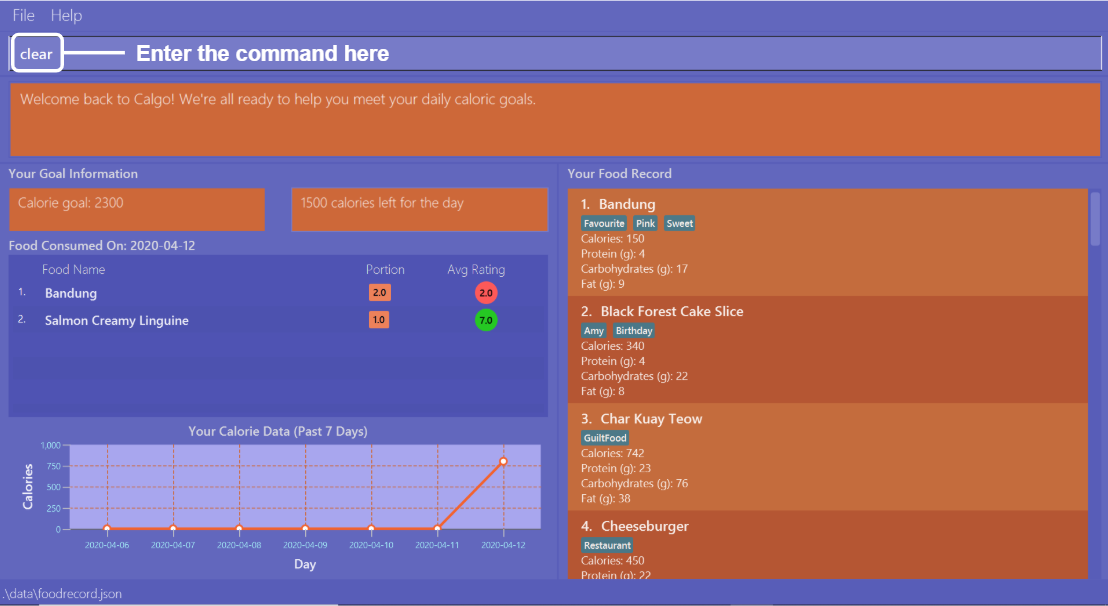
First, type clear and then press enter, as shown in the above diagram.
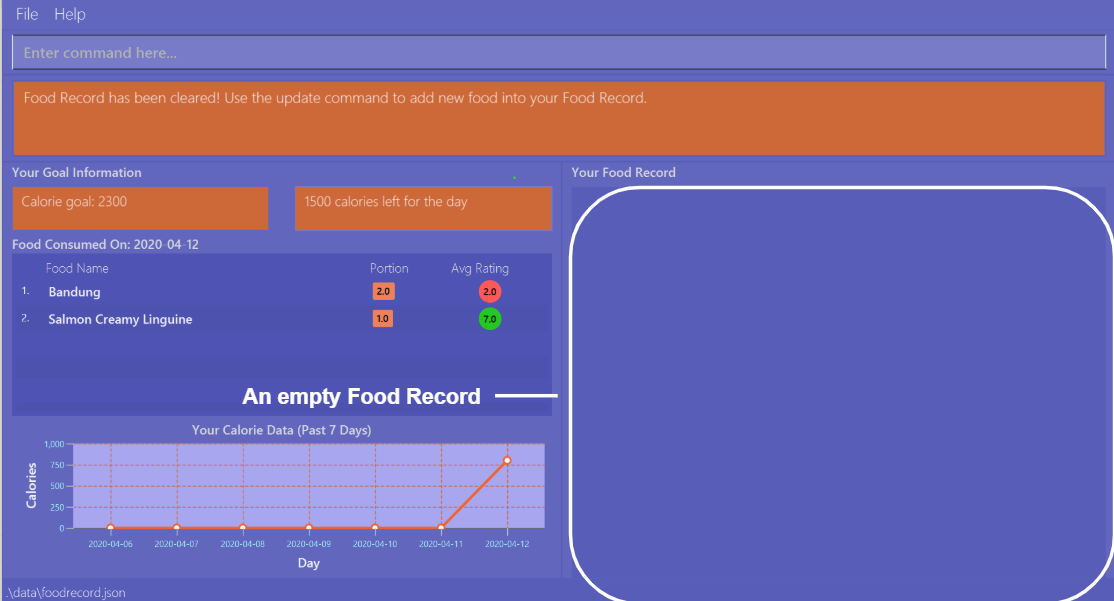
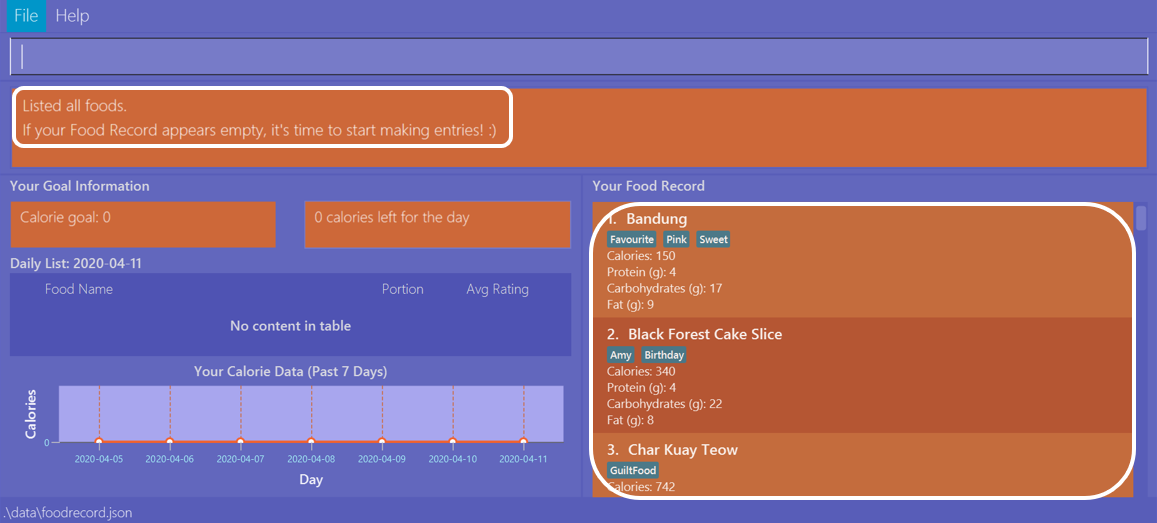
Upon entering the command, all your Food entries in the Food Record will be deleted. This will result in an empty Food Record, as shown above.
As mentioned previously, your data in the Consumption Record and Graph Display is left unchanged.
5.2. delete : Deleting a Food from current Food Record
(by Zhang Xian)
If you no longer require Calgo to store a particular Food and its nutritional values for you, you can use the delete command
to remove the specified Food from your Food Record.
The Food that you wish to delete must already exist in the current Food Record.
|
For your convenience, the NAME field of your input for the delete command is case insensitive. Therefore, n/Pizza
and n/pizza are treated by Calgo as the same Food.
|
Format: delete n/NAME
Example:
Say you want to remove a Food, Pizza, that already exists in your Food Record. This is how you can do it:
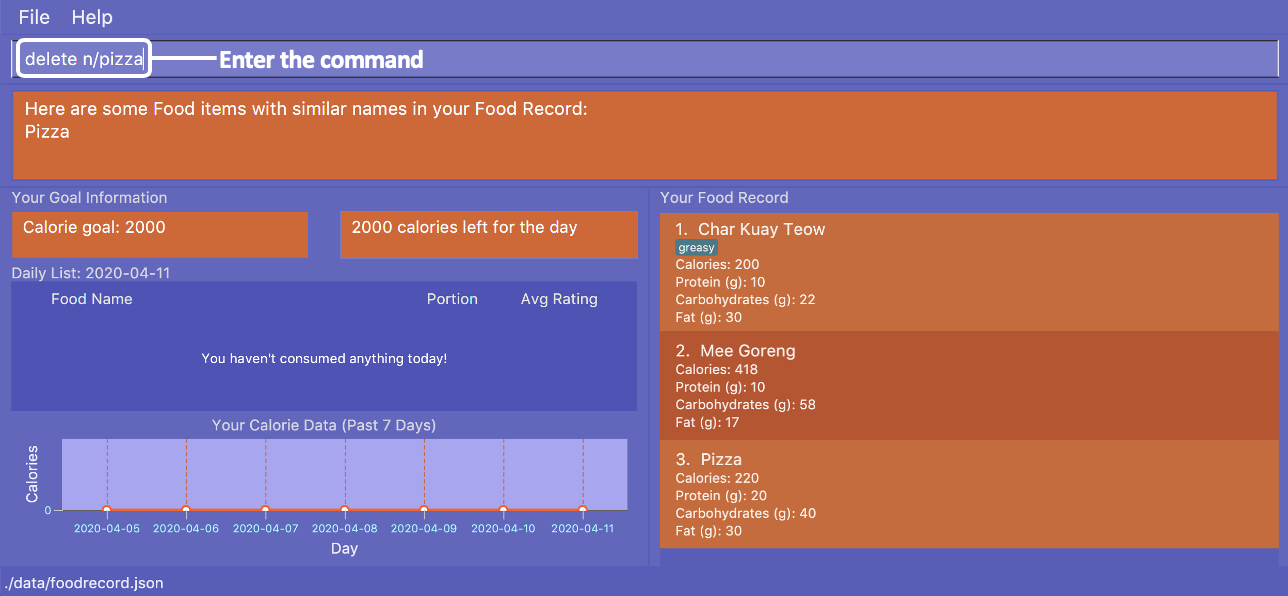
You should first enter delete n/pizza as input, and press enter. Note that delete n/Pizza also has the same effect.
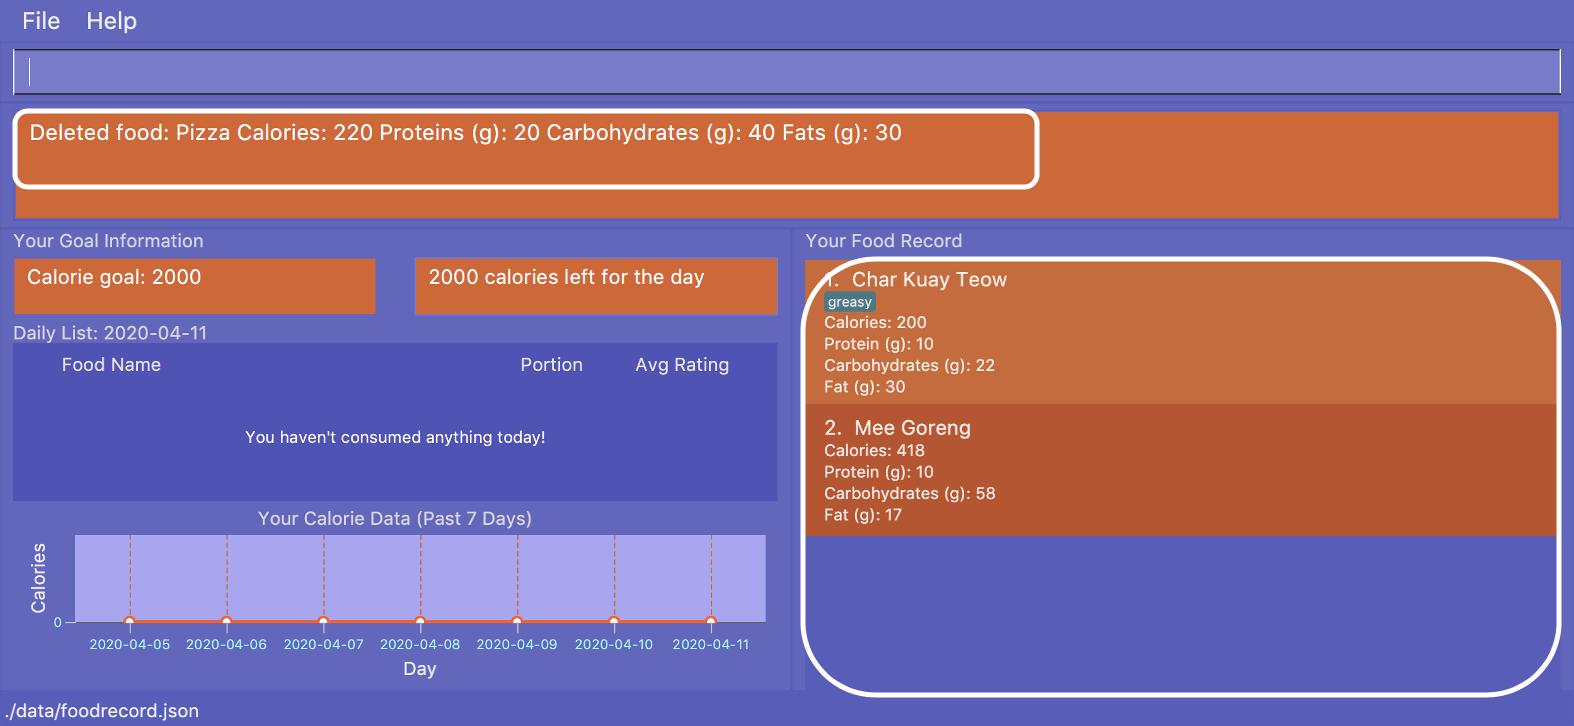
Once the command has been entered, the Result Display shows the results of your command and the Food Record no longer shows
a Food entry for Pizza.
5.3. exit: Closing Calgo
If you want to exit the App, you can use the exit command.
| All your data is automatically saved upon exiting Calgo. |
Format: exit
5.4. export : Exporting the current Food Record into a reference sheet
(by Eugene)
Obtaining a portable copy of the current Food Record may be useful for various purposes. For instance, you can
conveniently share your Food entries with friends, print the Food Record for future reference, or even adapt it to
suit your personal cooking needs in the kitchen. Whatever the purpose, we have you covered with the export command.
The export command provides you with a neatly formatted, editable file that reflects all entries in the current Food Record.
This file (named FoodRecord.txt) will be created in the data/exports folder.
Here are some key pointers for using the command:
This lets you manually track your diet using a reference sheet of your past Food entries. You can freely edit this
reference sheet to include information outside of Calgo. |
Certain Food names may be too long to fit into the given space. Such names will be shown on multiple lines.
However, rest assured that all your information is still captured and neatly organised.
Individual entries will also appear on separate lines.
|
Format: export
(any parameters entered are ignored)
Example:
Let’s suppose you wish to export the current Food Record so that you can print a copy for reference while cooking. Here’s how you can do it:
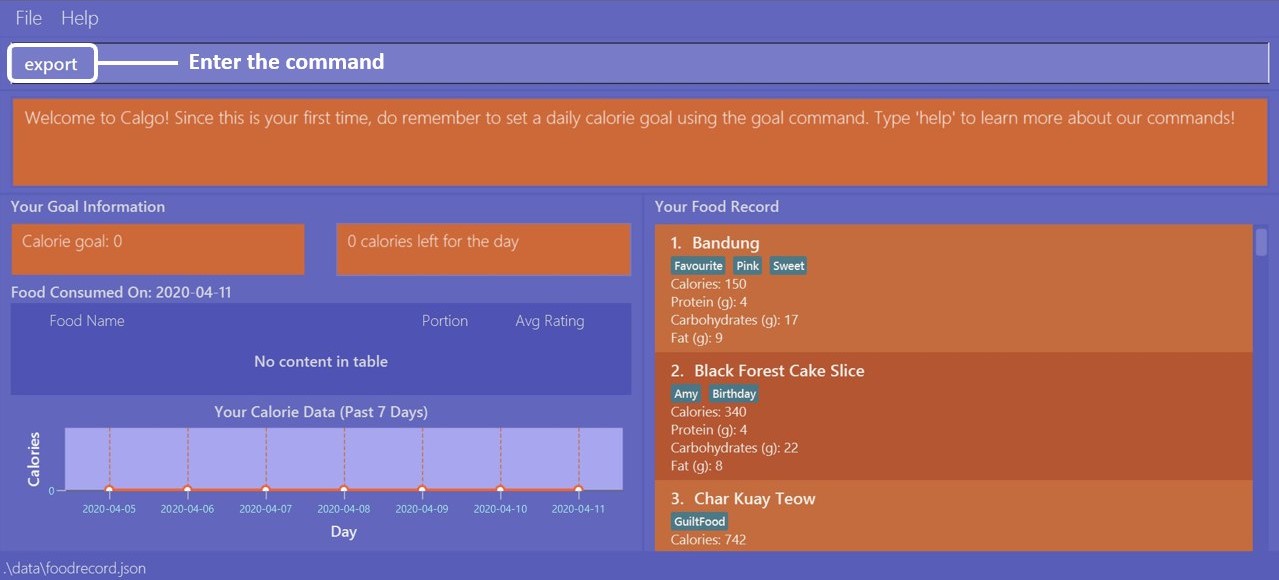
You should type in the command and press enter, as seen above.
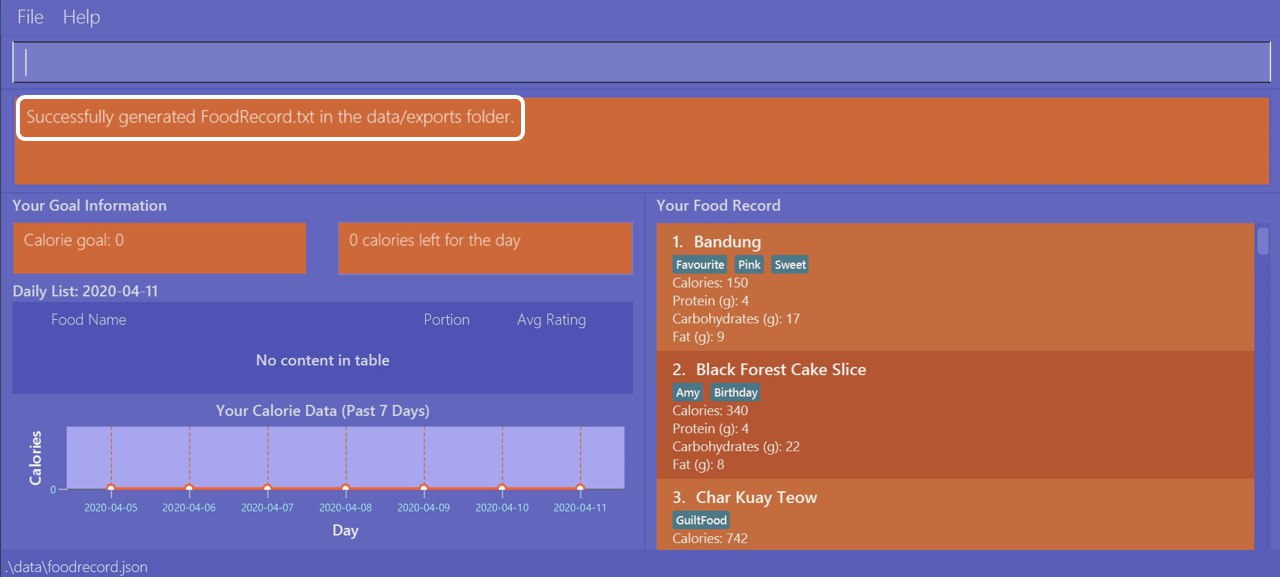
Doing so, Calgo will show you a result message indicating the copy has been successfully generated.
You can find this copy (named FoodRecord.txt) in the data/exports folder.
5.5. find : Finding a Food entry by nutritional value or keyword(s)
(by Eugene)
When you have many entries in the Food Record, it may be rather difficult to search for a particular one.
This is where the find command comes in nicely.
The find command shows all Food entries that have a nutritional value matching what you specify. This can be the
number of calories, or the number of grams of protein, carbohydrate or fat.
Alternatively, you can choose to search for a keyword which appears in any part of the name or in one of the tags
associated with a particular Food entry.
Here are some key pointers:
If you’re a fast typist, fear not! We understand the possibility that typing errors can be made quite often, so any
additional input for the find command without a preceding Prefix (e.g. n/, p/) will be ignored.
|
The Food Record displays the relevant entries of each find command. We can reset the Food Record to show all
entries once again using the list command.
|
Format: find [n/NAME] [cal/CALORIES] [p/PROTEINS] [c/CARBOHYDRATES] [f/FATS] [t/TAG]
(Reminder: choose only 1 parameter)
Examples:
Example 1: Say you want to use Calgo to search for a Food entry with 150 calories because you are
looking for a light snack. Here is how you can do it:

You should type find cal/150, then press enter.
Once the command has been entered, the Result Display shows the results of your command and the Food Record
displays the relevant entries with 150 calories.
Example 2: Say you wish to find entries which contain the keyword Cheese in their name, but your hand slipped and
the keyboard only typed Chees. This is what happens:
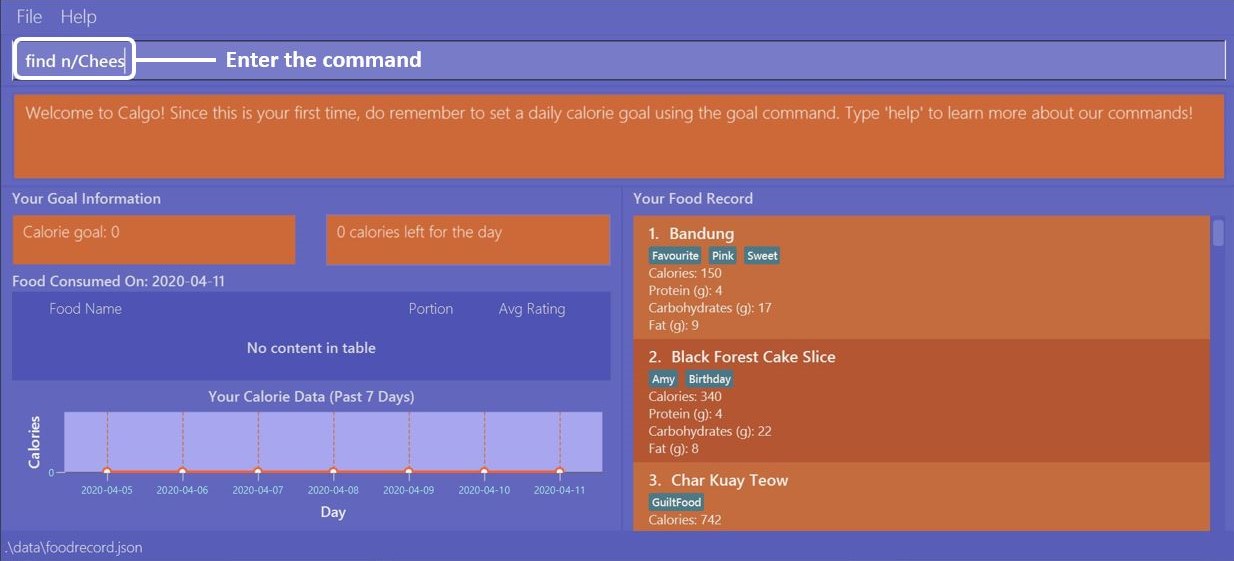
You are likely to enter find n/Chees as the command input.
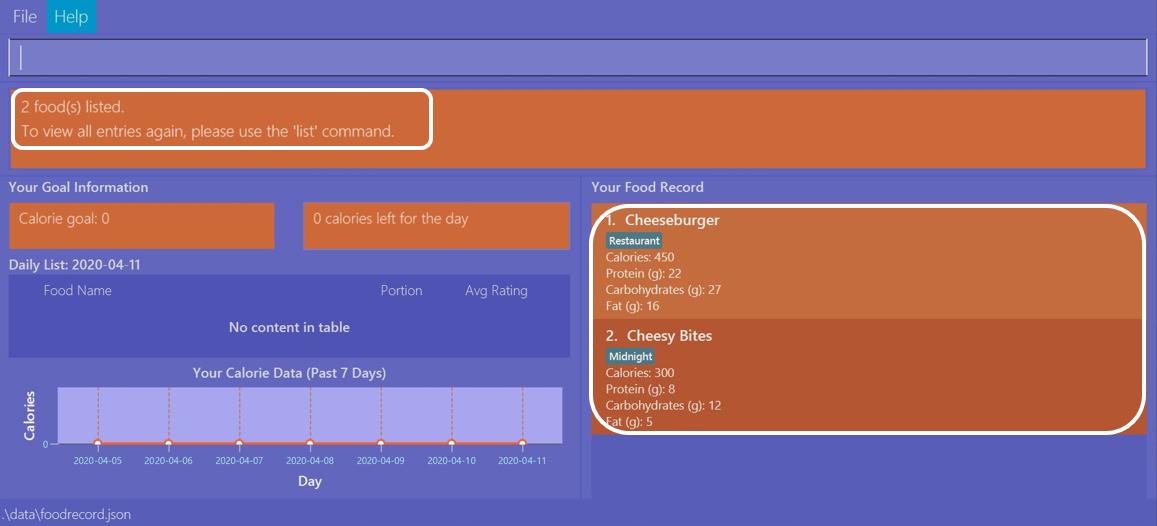
Once the command has been entered, the Result Display shows the results of your command and the Food Record shows
the relevant entries which contain Chees in their name. This is not too bad, as you still obtain entries that will
be largely relevant to Cheese. This shows that the find command can search for Food entries
with incomplete keywords.
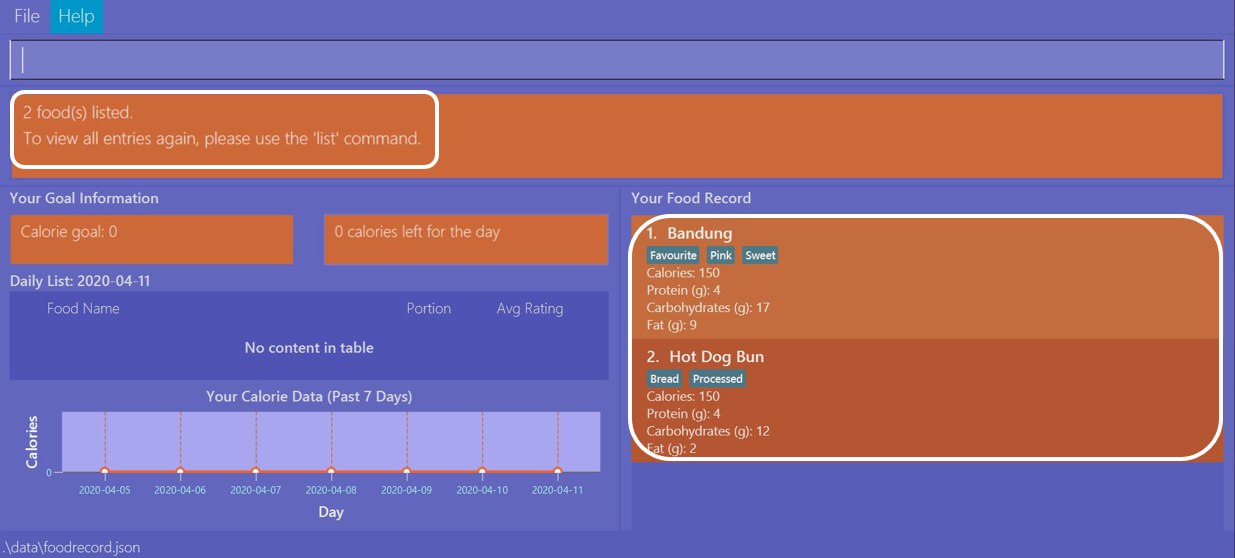
Example 3: Say you are lazy but wish to find entries containing the keyword sweet in their tag. Here is how you can do it:

You can type find t/swe as input, and then press enter.
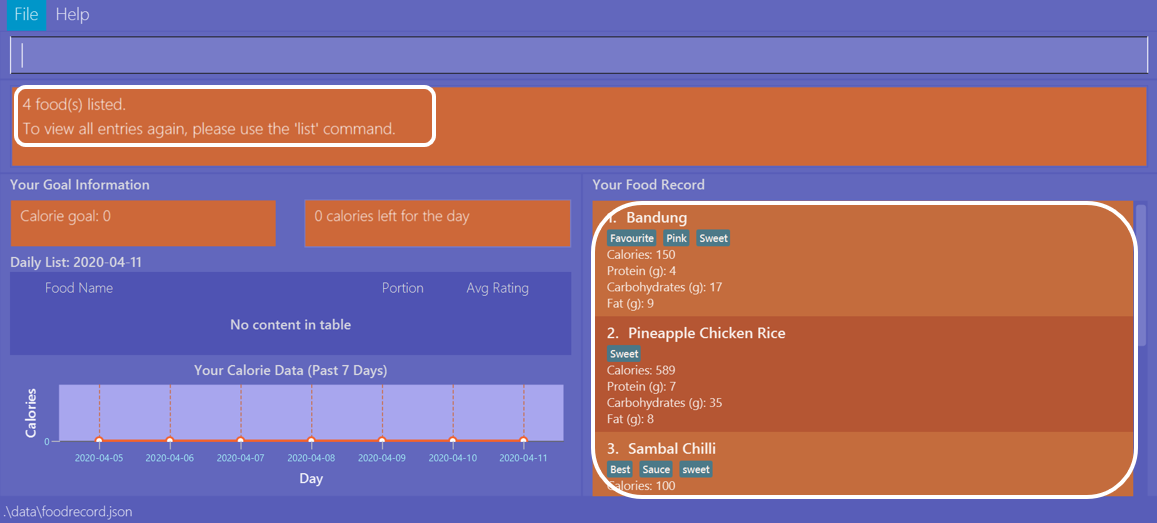
Upon entering the command, the Food Record will display all entries which have the swe keyword present in any one of
their tags. As you can search using incomplete keywords, the intended search for the sweet tag will also have its result shown.
Please note that the search is case-insensitive, an example being the resulting Sweet tag of Bandung. Moreover,
as with Example 2, we allow for incomplete words to be used as search keywords.
5.6. goal : Setting a daily calorie target
(by Vineeth)
A healthy lifestyle is not achieved overnight. Calgo understands the importance of keeping the end in mind with regards to achieving your healthy lifestyle.
Thus, to motivate you to put in consistent effort, you can set daily calorie goals for yourself using the goal command.
Here are some key pointers:
| Acceptable values are positive integers, ranging from 1 to 99999. |
Format: goal GOAL
Example:
Let’s suppose you are a young adult who is trying to lose weight because your favourite jeans have become too tight. You search online for the ideal number of calorie you should consume daily to lose weight. A credible online source states it should be 1900 calories. Now, you want to reflect that daily calorie goal in Calgo. You can do that by following this simple step:
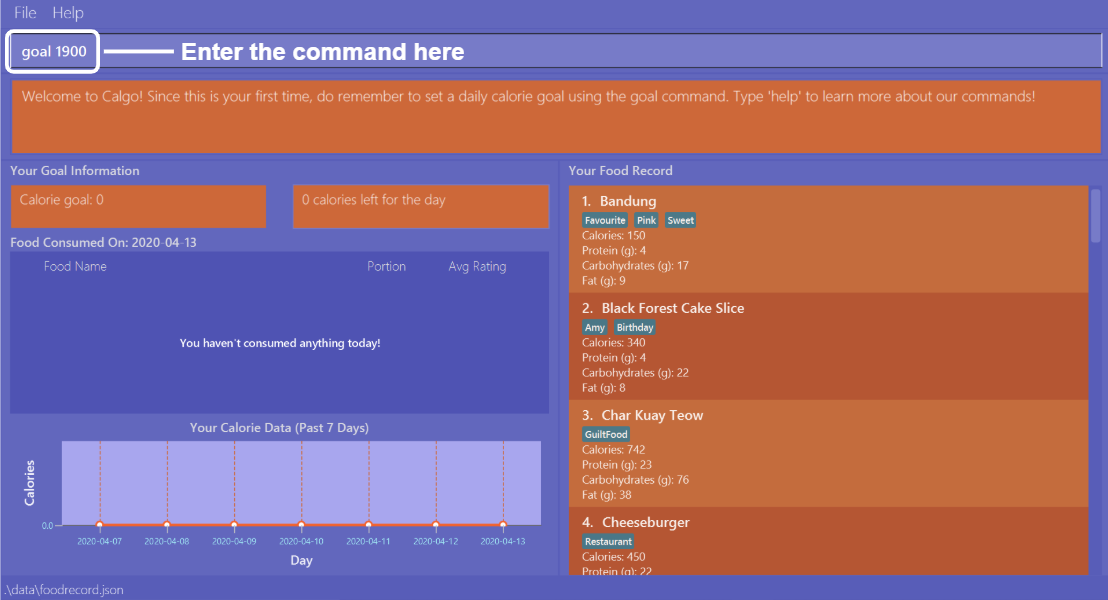
Type in goal 1900 and press enter, as shown above.
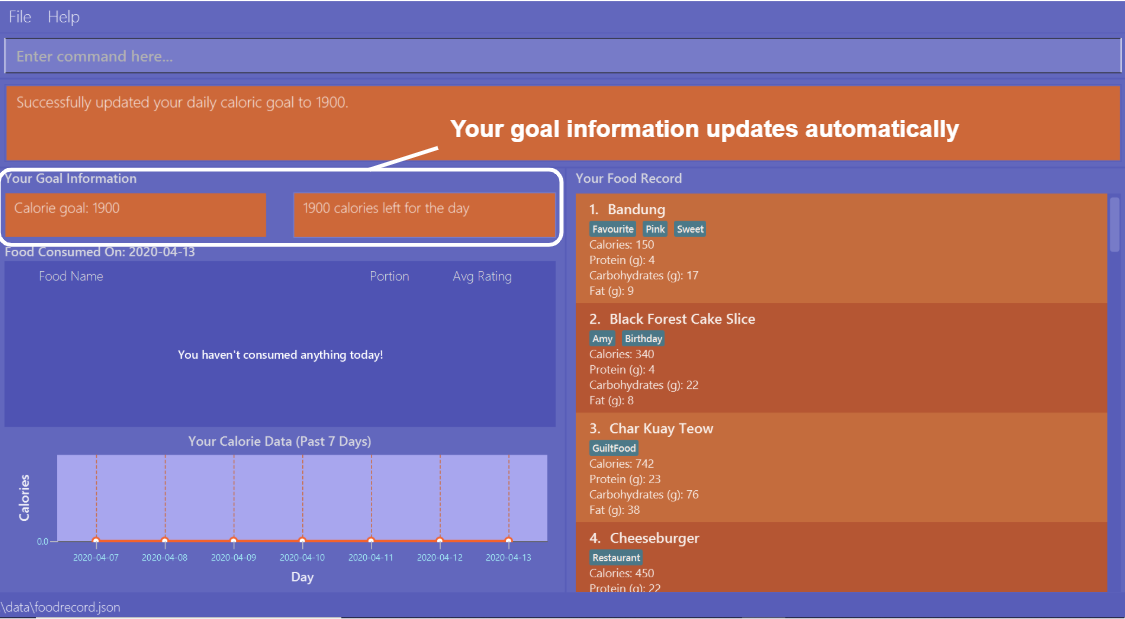
As you can see, the Daily Goal Display has updated to reflect your daily calorie goal. You can now track your meals
and get immediate updates on the remaining amount of calories you have to consume for that day to achieve your goal.
5.7. help : Displaying help when lost
(by Janice)
Whether you are an experienced Calgo user or a newcomer to the App, it can be hard to remember what a command’s usage and format
is. Thus, the help command aims to remind you of them.
Here are some key pointers:
Format: help [COMMAND_WORD]
Example:
Let’s say you’ve forgotten how to add Food entries to your Consumption Record. You know there is a command called nom,
but don’t recall its format. You can use the help command to obtain the format like so:
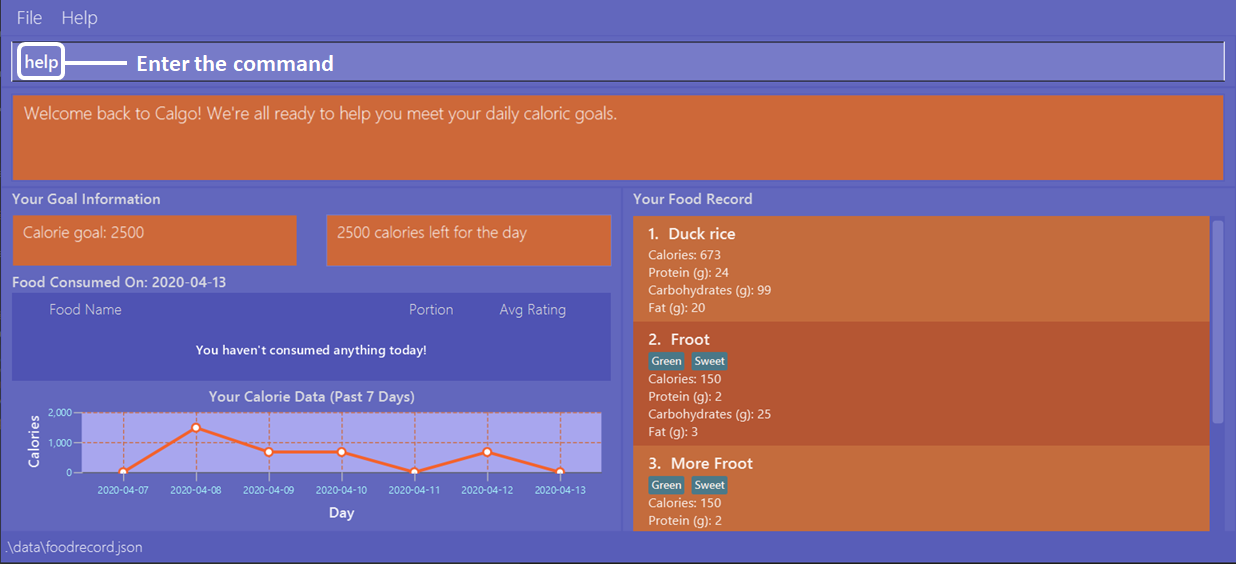
Type help, then press enter.
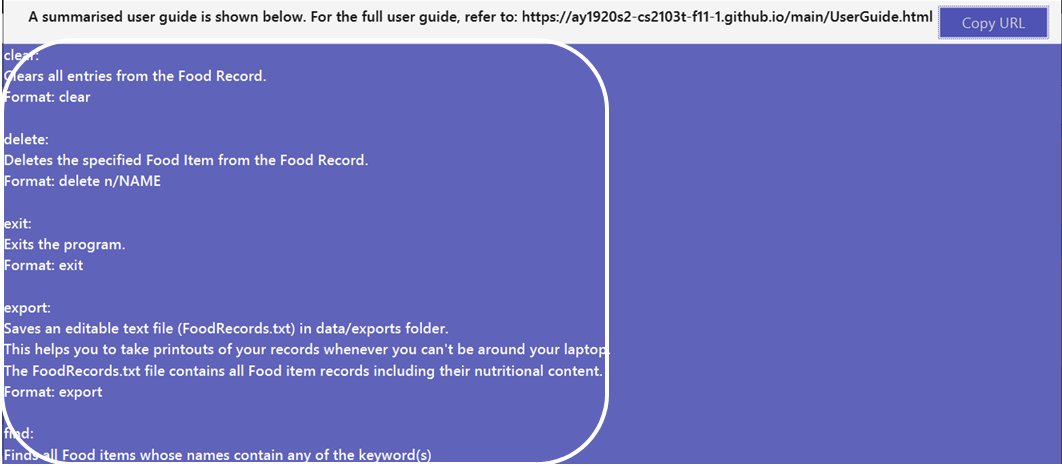
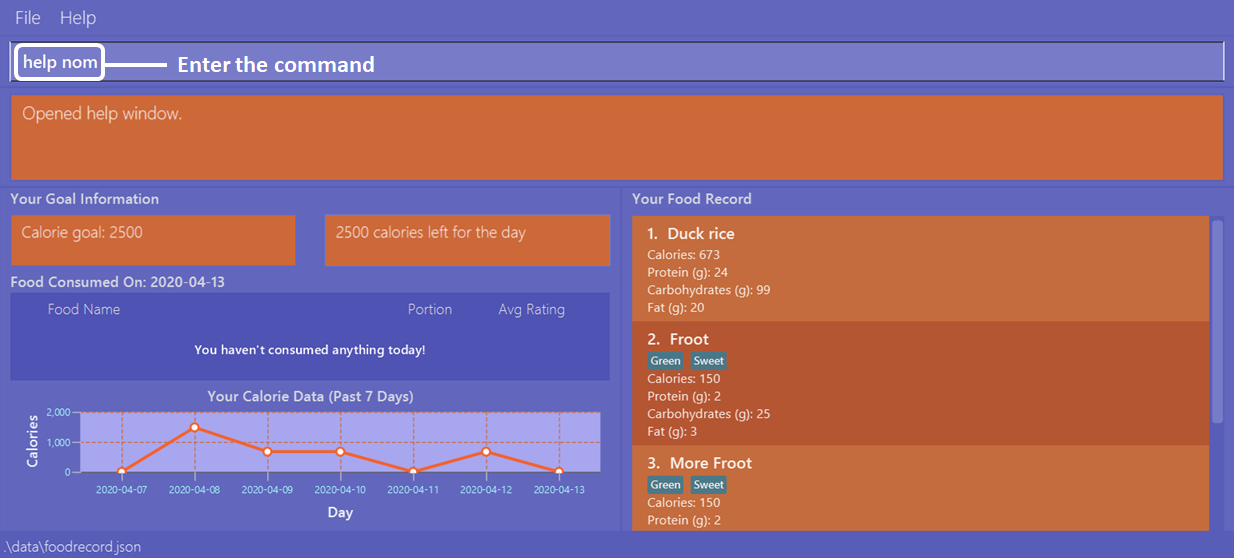
This creates a popup (the Help Window) with command guides. However that displays all the commands, which might make searching for only
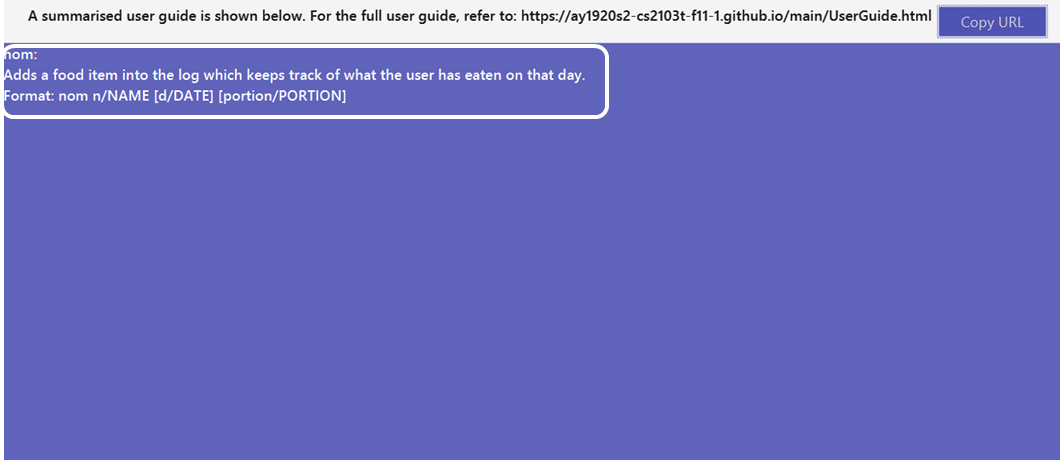
nom a bit daunting. Instead, you can type help nom, then press enter.
As you can see, the Help Window popup now only shows the command guide for nom.
5.8. list : Listing all Food in current Food Record
(by Eugene)
With a large number of entries in the Food Record, you may remember that we can use the find
command to display only the relevant Food entries. Once we are done with the search, we will eventually want to
view all entries again. This is where the list command comes in handy.
The list command resets the display accordingly to show all entries in the Food Record. These entries will be neatly sorted,
just as the Food Record previously appeared:
You can think of this as the reverse of a find command.
After a find command, you are advised to complete your intended actions first, before using the list command to
reset the display. This allows for a smoother workflow as you will now avoid the need to perform the same find command again.
|
Format: list
(any parameters entered are ignored)
Example:
Let’s say you want to view all entries again after performing a find n/Chicken command. You can do the following:
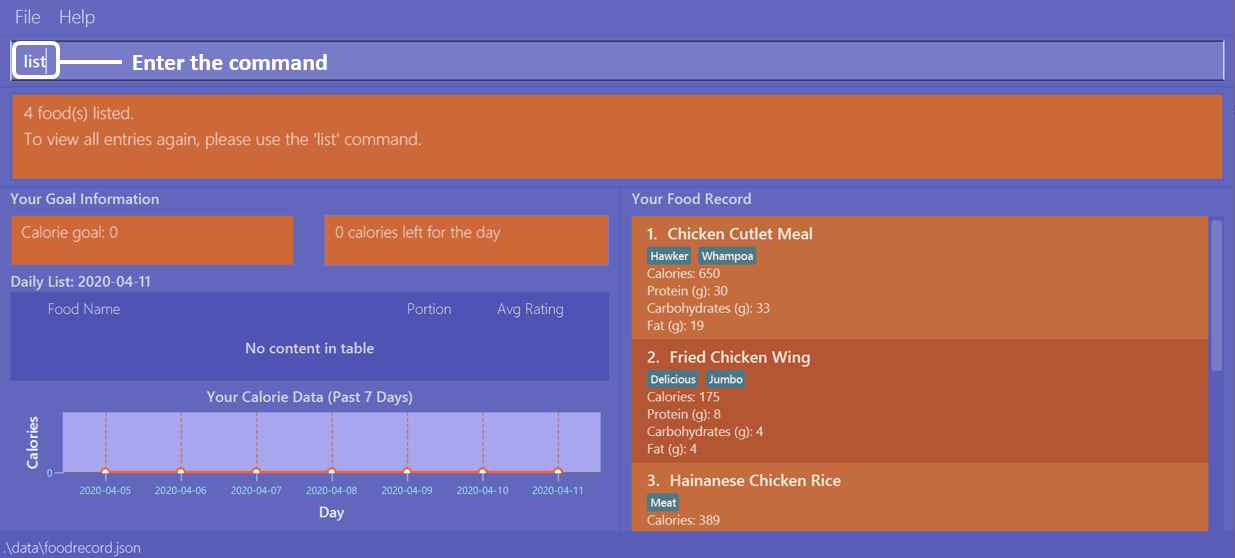
Type list as input, then press enter.
The Result Display will then indicate the result of your command, and the Food Record will now show all Food entries once again.
5.9. nom : Adding Food to Consumption Record
(by Ruicong)
Your Consumption Record stores everything that you have consumed.
With the nom command, you can add Food that you have consumed on a certain day to your
Consumption Record.
The nom command helps you to keep track of your consumption on certain date.
Below is some information to keep in mind:
As you enter nom n/.., Calgo will show you Food suggestions that match what you are searching for in the Result Display.
Names in Calgo are case insensitive, so you can type quickly without worrying about the specific name of the Food.
|
If you have planned to eat something at a future date, you can use nom to record a consumption
with a date that comes after today.
|
Format: nom n/NAME [d/DATE] [portion/PORTION][r/RATING]
Example:
Suppose you want to have a Cheeseburger today and have already stored its nutritional content
in Food Record. Since you just want to dig in as soon as possible, yet still want to jot your meal down,
you decide to enter the simplest command possible. Here’s how you do it:
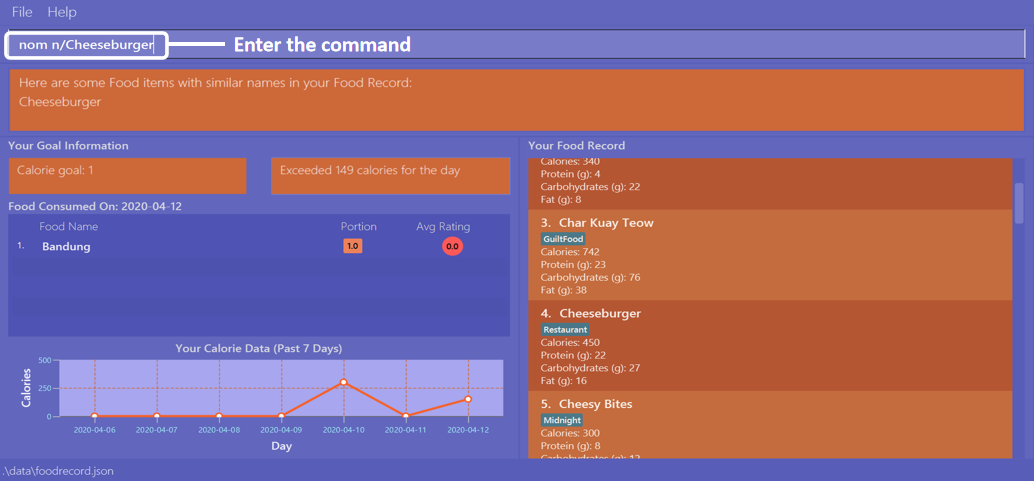
First, enter nom n/Cheeseburger as input and press enter.
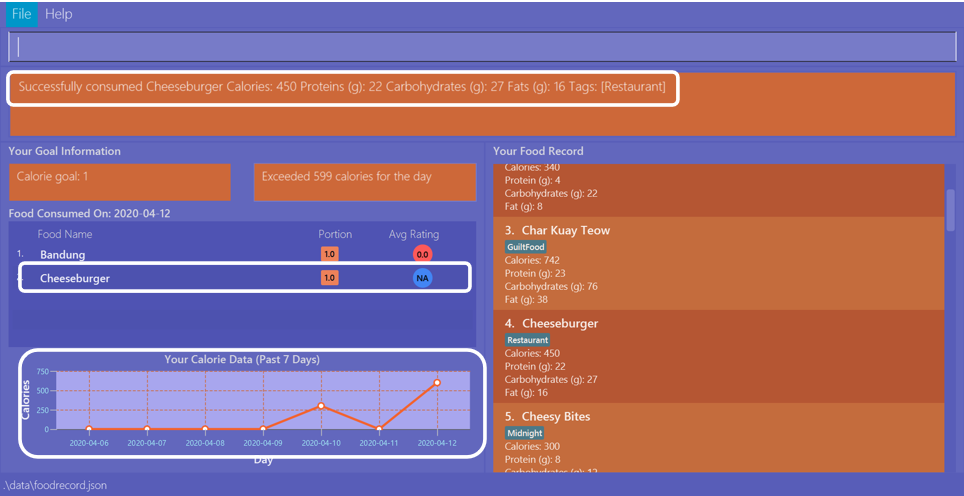
Once you enter the command, the Result Display will inform you that the food has been consumed.
The Consumption Record panel and Graph Display are updated to reflect your latest consumption.
5.10. report : Generating key statistics and insights
(by Vineeth)
Why stop at keeping track of your meals? Go a step further and use your past consumption patterns
to learn how to improve your eating habits. Moreover, won’t it be convenient if you can automatically generate tips on how to improve?
This is exactly what the report command can help you with!
Given a date, the report command analyses your consumption pattern in that day to generate relevant statistics and
helpful insights for improving your diet. You no longer have to tediously calculate the total amount of calories you consumed in a day. Calgo does it for you, instantly!
The document generated by the report command is stored in the data/reports folder. This document is named after the given date in this format: yyyy-mm-dd_report.txt. For instance, if you generate a report on 27th of April 2020, the generated document is 2020-04-27_report.txt.
|
To generate more insightful suggestions, do set a daily calorie goal before generating the report. To learn how to do that,
check out the goal command here.
|
Refer to the list below for the various types of insights that you can easily obtain from the report command.
Format: report d/DATE
When entering the report command, do note there is a default behaviour for the DATE prefix. If you do not provide the date, or if its Prefix does not have a value,
Calgo will by default take it that you intend to generate a report based on today’s date.
|
Example:
Let’s suppose you had a buffet on 27th of April 2020 and you managed to nom lots of exciting Food into your
Consumption Record. It is now the end of the day and you want to look back and find out how you fared. This is what you can do:
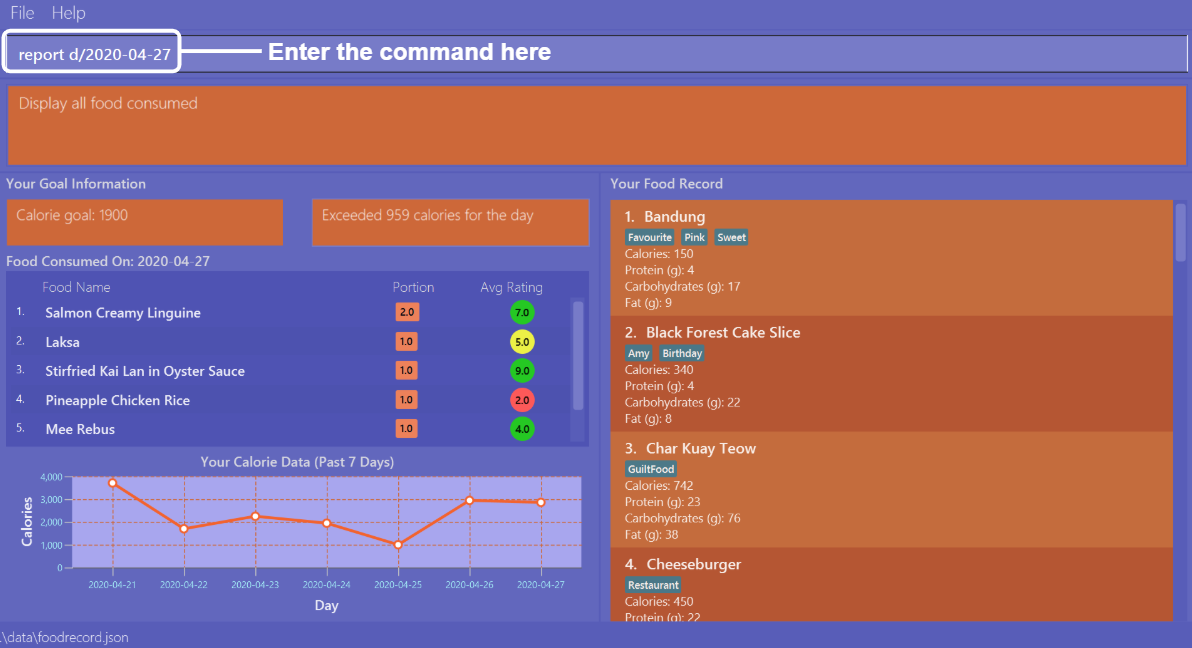
First, type report d/2020-04-27 and press enter, as shown above.
Second, go to the data/reports folder and open 2020-04-27_report.txt. You will
see a report that looks similar to the one in the above screenshot.
The following steps breakdown what information is included in each section of the report.

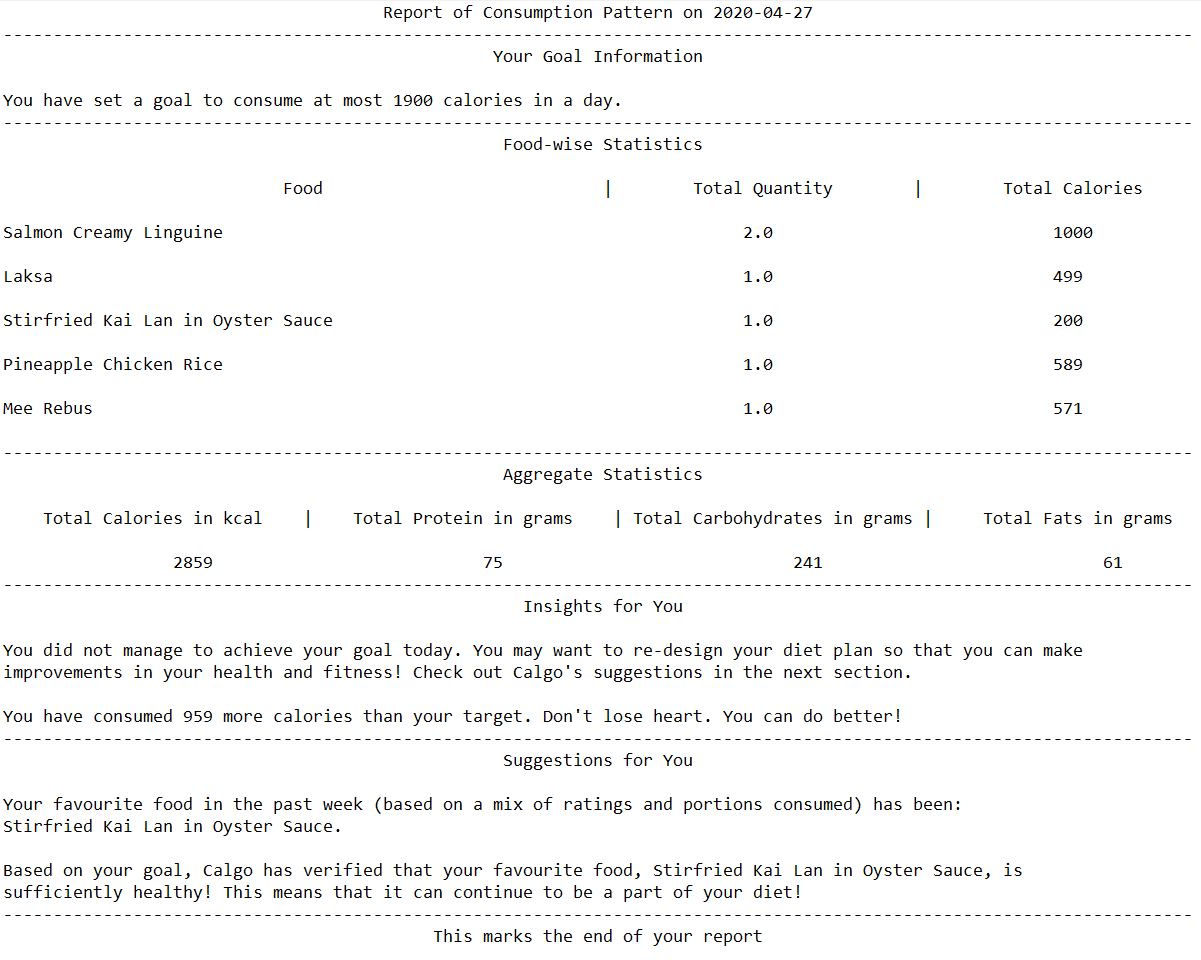
The first section is the Report Header, which states the date of your consumption pattern that is being analysed in the report. In this case,
your food consumption pattern on the 27th of April 2020 is analysed in the displayed report screenshot.

The second section is Your Goal Information. This section reminds you of the daily calorie goal that you have set for yourself.
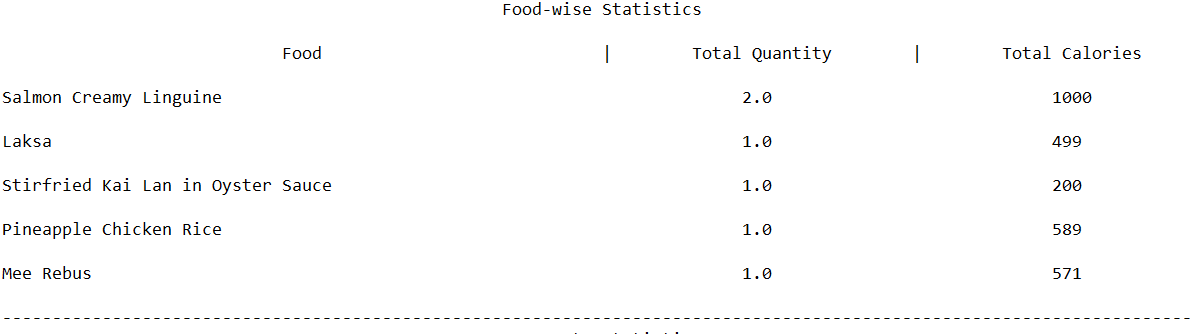
The third section is Food-wise Statistics. As the name suggests, this section provides you with relevant statistics for every Food entry in your Consumption Record of the given day.
In this case, you can see a variety of Food entries that you have tracked from your buffet experience. For each Food entry, the report displays the name of the Food, the total number of portions you consumed and the total amount of calories from that Food.
You can use this information to realise what Food you may be over-consuming.

The fourth section is Aggregate Statistics, which shows you the total amount of calories, protein, carbohydrates and fat that you have consumed on the given day.
This section could be particularly helpful if you are interested in tracking your total nutritional intake each day.

The fifth section is called Insights for You. In this section, Calgo uses your daily calorie goal to explain how close you were to achieving it.
For you to continually improve your eating habits, Calgo, like any other friend, pushes you with motivating messages and congratulates you if you achieved the goal.
In this case, as you exceeded the daily calorie goal by 959 calories, Calgo provides you with some reassurance that you can do better the next day to ensure that you do not give up.

The penultimate section is Suggestions for You. In this section, Calgo analyses your Consumption Record of the past week from the given date to find out what you can do to improve your eating habits.
Calgo does this by using a mix of your ratings and quantity consumed of each Food to intelligently infer what your favourite Food is. It then analyses if you can continue to keep your favourite Food in the past week in your diet based on your daily calorie goal.
Over time, through Calgo’s smart suggestions, you will eventually have a diet consisting of your favourite Food entries that are compatible with your goal. How awesome is that!

The final section is the Report Footer, which informs you that the report has concluded. This is the part where you realise that Calgo provides you with so many key insights in such a neatly organised and compact document.
5.11. stomach : Showing all Food consumed on a particular day
(by Ruicong)
Do you find it a hassle to constantly recall what you ate? Can’t seem to remember what you had for lunch last week?
You can now remember everything, because Calgo remembers for you. The stomach command displays all of the Food you ate on a
particular day, showing it in the Consumption Record.
For a more detailed statistical report with nutritional values of Food consumed, you can refer to
the section on the report command here.
Here are some key pointers:
Format: stomach [d/DATE]
Example: If you want to see what you have consumed on 12 April 2020, here’s how you can do it:
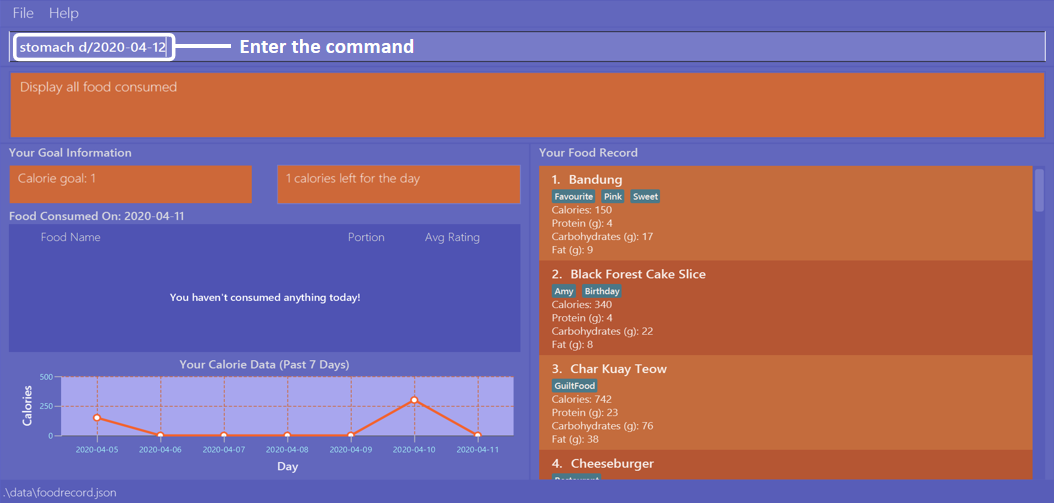
Type the command stomach d/2020-04-12 as input and press enter.

The Consumption Record will display all the Food you have consumed on 12 April 2020.
You can also see that Daily Goal Display has updated to show the amount of calories you have consumed on 12 April 2020,
relative to your daily goal.
5.12. update : Updating Calgo’s Food Record
(by Zhang Xian)
Tired of searching for nutritional information online for the same food repeatedly? Frustrated of having no convenient place to note it down?
The update command allows you to enter new Food entries into Calgo’s Food Record. Moreover, as a smart feature, Calgo detects if
there is an existing Food entry with the same name. If so, it will edit that Food entry with new information provided by you.
Here are some key pointers:
We suggest you to be as specific as possible in naming your Food.
Instead of naming your Food "Chocolate", perhaps "White Chocolate" or "Dark Chocolate" would be a better idea.
|
Format: update n/NAME cal/CALORIES p/PROTEINS c/CARBOHYDRATES f/FATS [t/TAGS]
Examples:
Example 1: Suppose you want to create a Food entry for Mee Goreng in Calgo. After searching online for the
nutritional values for Mee Goreng, you found that Mee Goreng has 418 calories, 8g of protein, 58g of carbohydrate and 17g of fat.
Here’s how you update your new Food, Mee Goreng, into your Food Record:
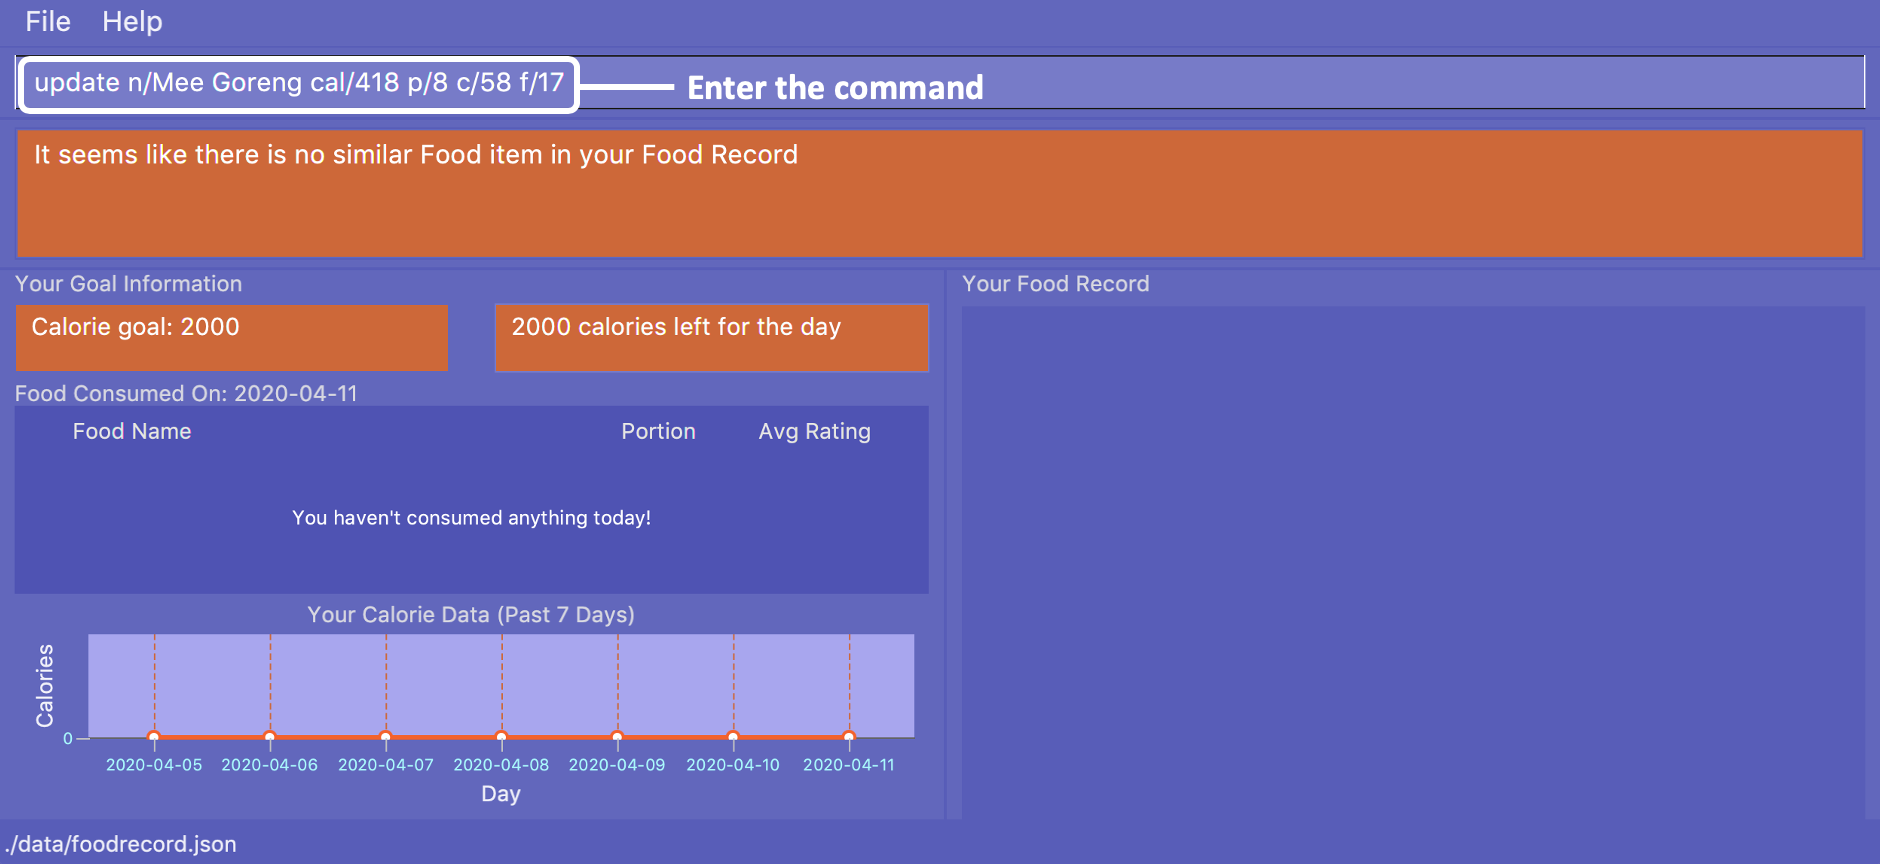
You should type update n/Mee Goreng cal/418 p/8 c/58 f/17 and press enter.
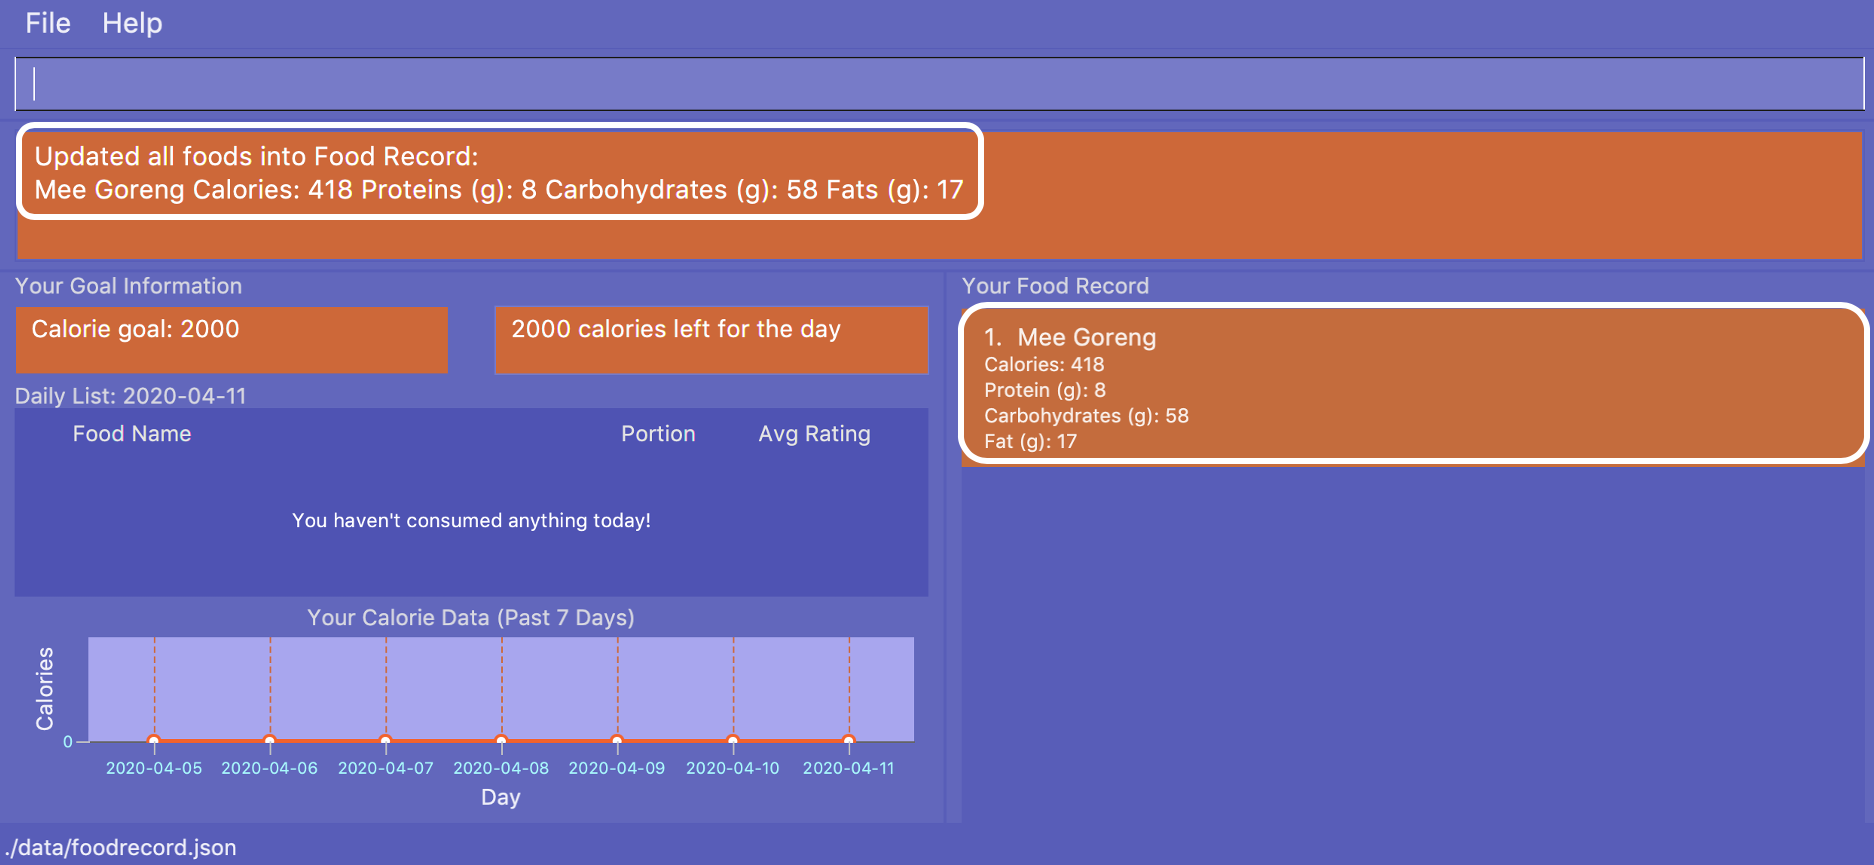
Once the command has been entered, the Result Display shows the result of your command and the Food Record has been updated with a new Food, Mee Goreng.
Example 2: Perhaps you realised that there was an error with the nutritional values keyed in for an existing Food, Mee Goreng, inside your Food Record.
You wish to update the protein value for Mee Goreng to a new value of 10g. This is how you can do it:
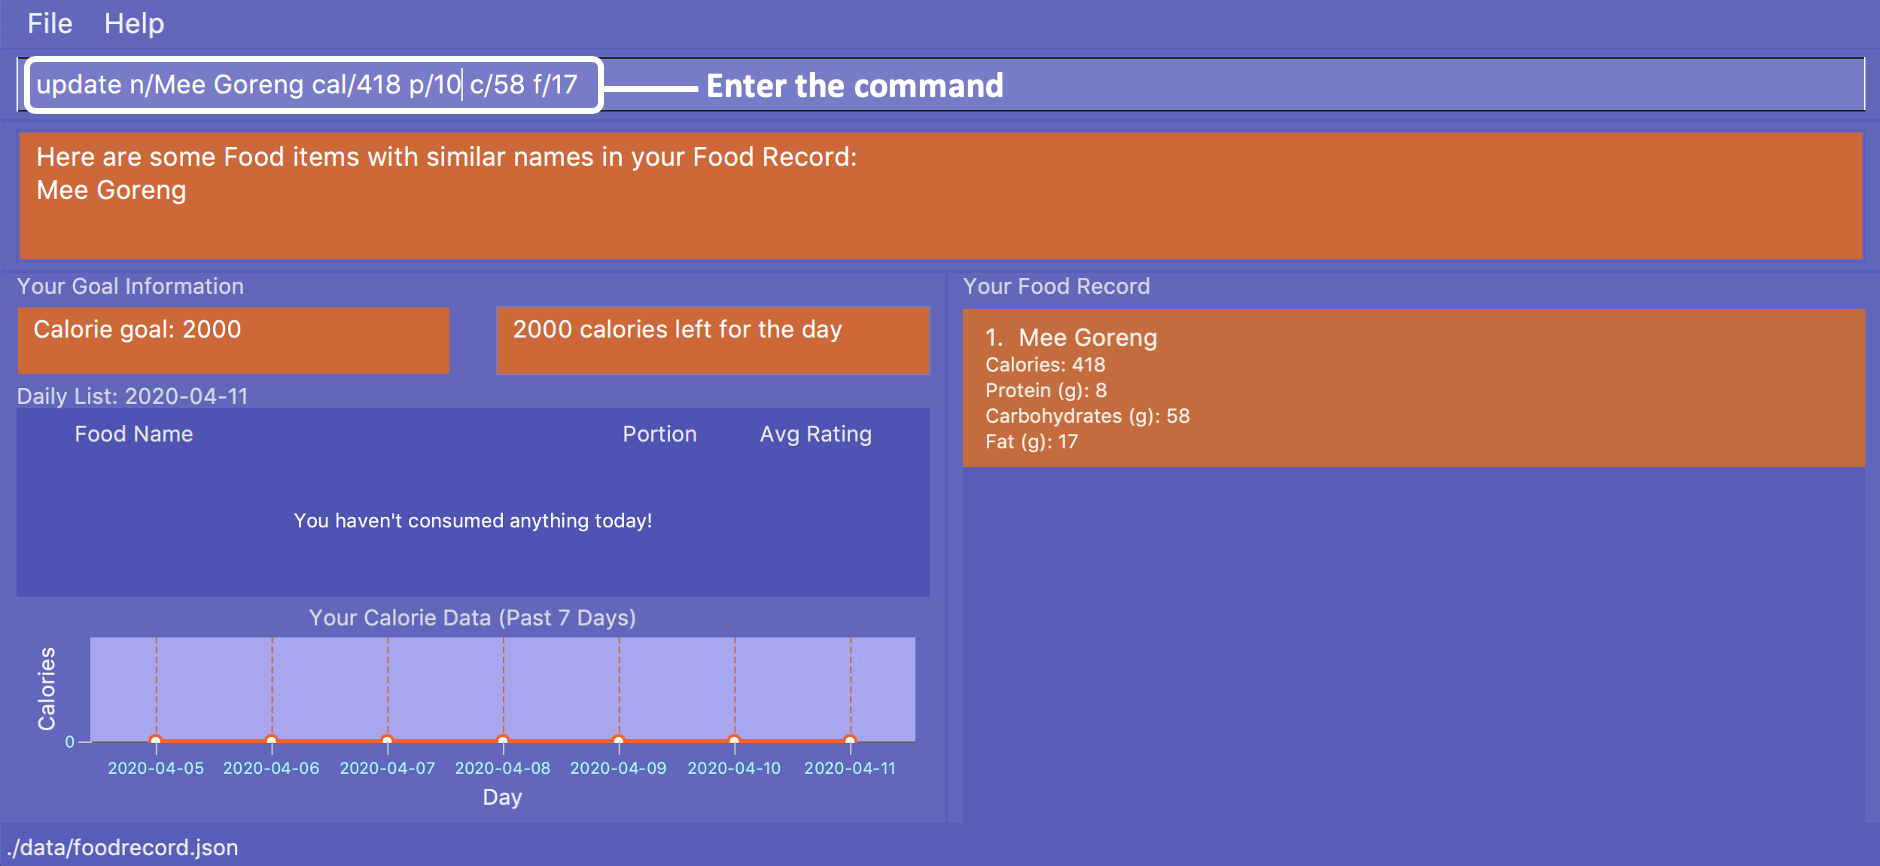
Type update n/Mee Goreng cal/418 p/10 c/58 f/17 as input and press enter.
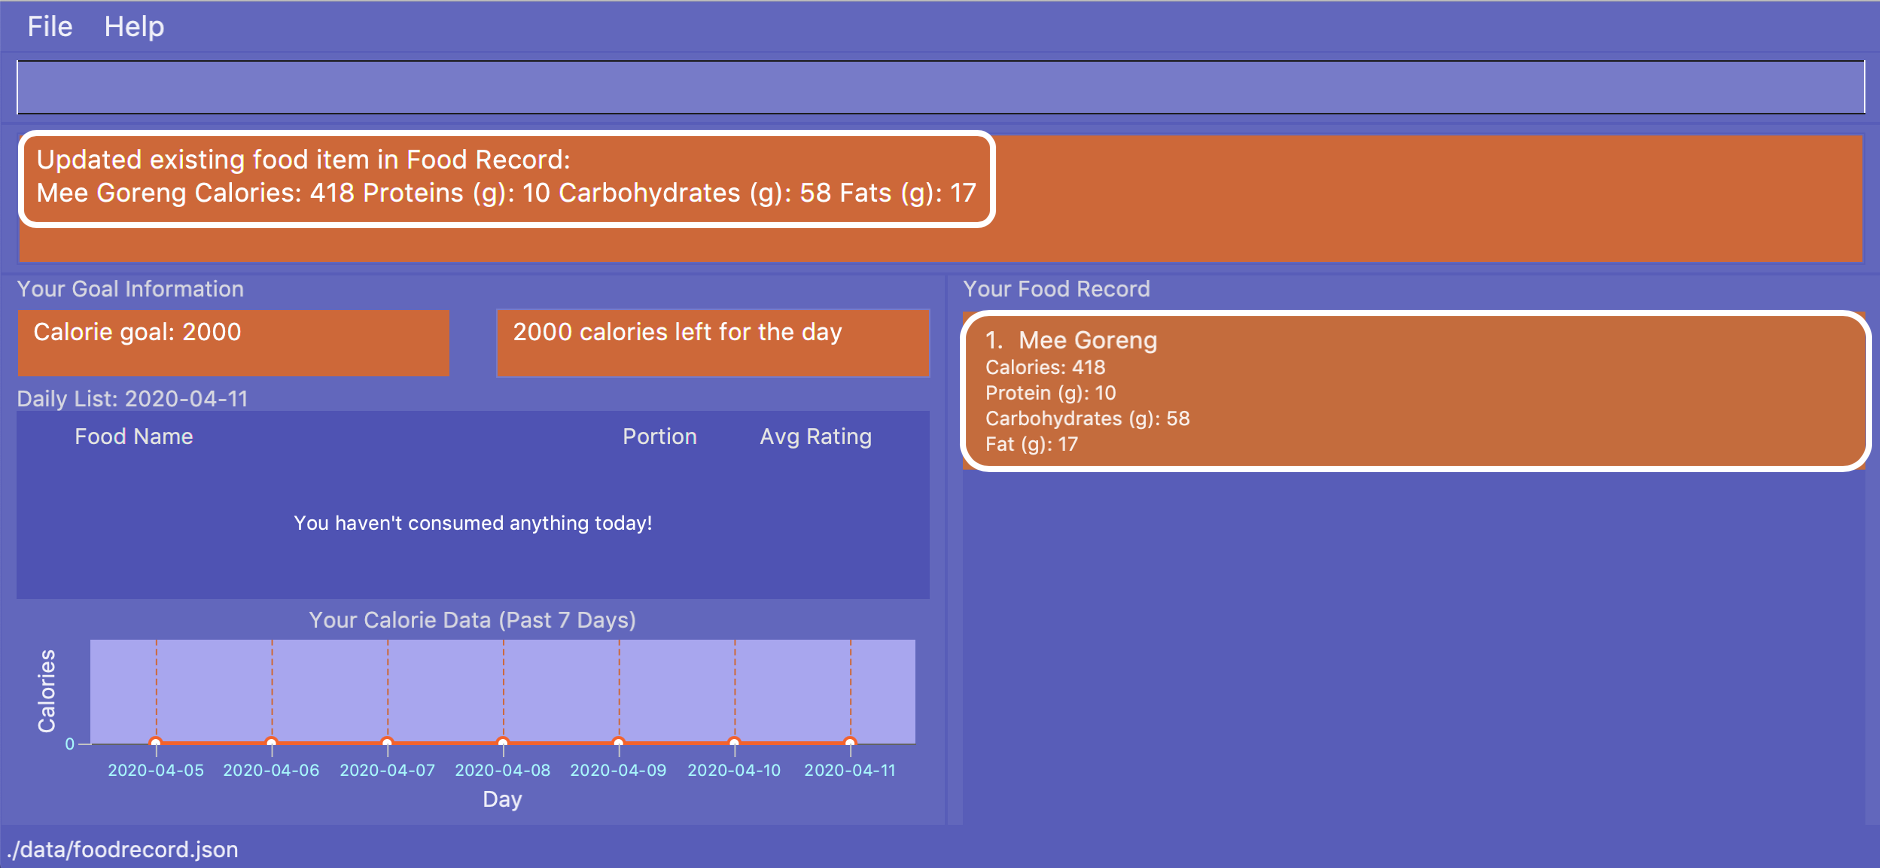
Once the command has been entered, the Result Display shows the result of your command and the Food, Mee Goreng, in
Food Record has been updated with a new protein nutritional value of 10g.
Example 3: Suppose you want to update a new Food, Char Kuay Teow, into the Food Record. However, you typed the
name of the Food in hurry and did not capitalise some letters properly.
Instead of "Char Kuay Teow", you accidentally typed "char KUay TeoW" in the name field. You can do this:
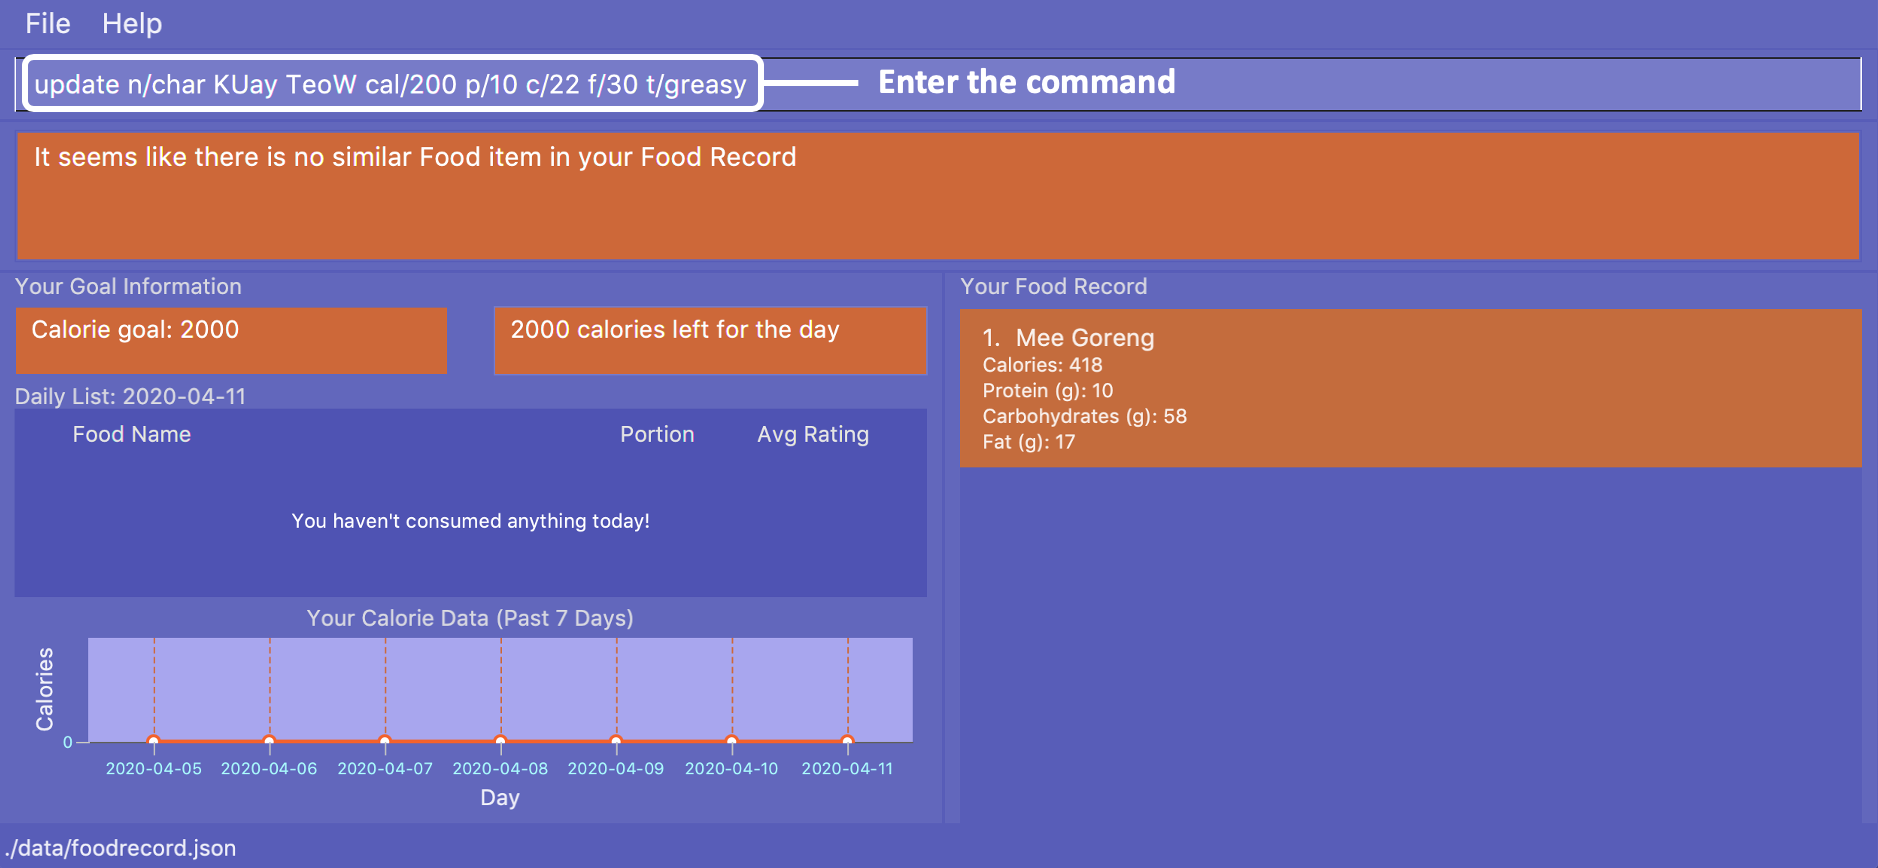
You can then type update n/char KUay TeoW cal/200 p/20 c/22 f/30 t/greasy and press enter.
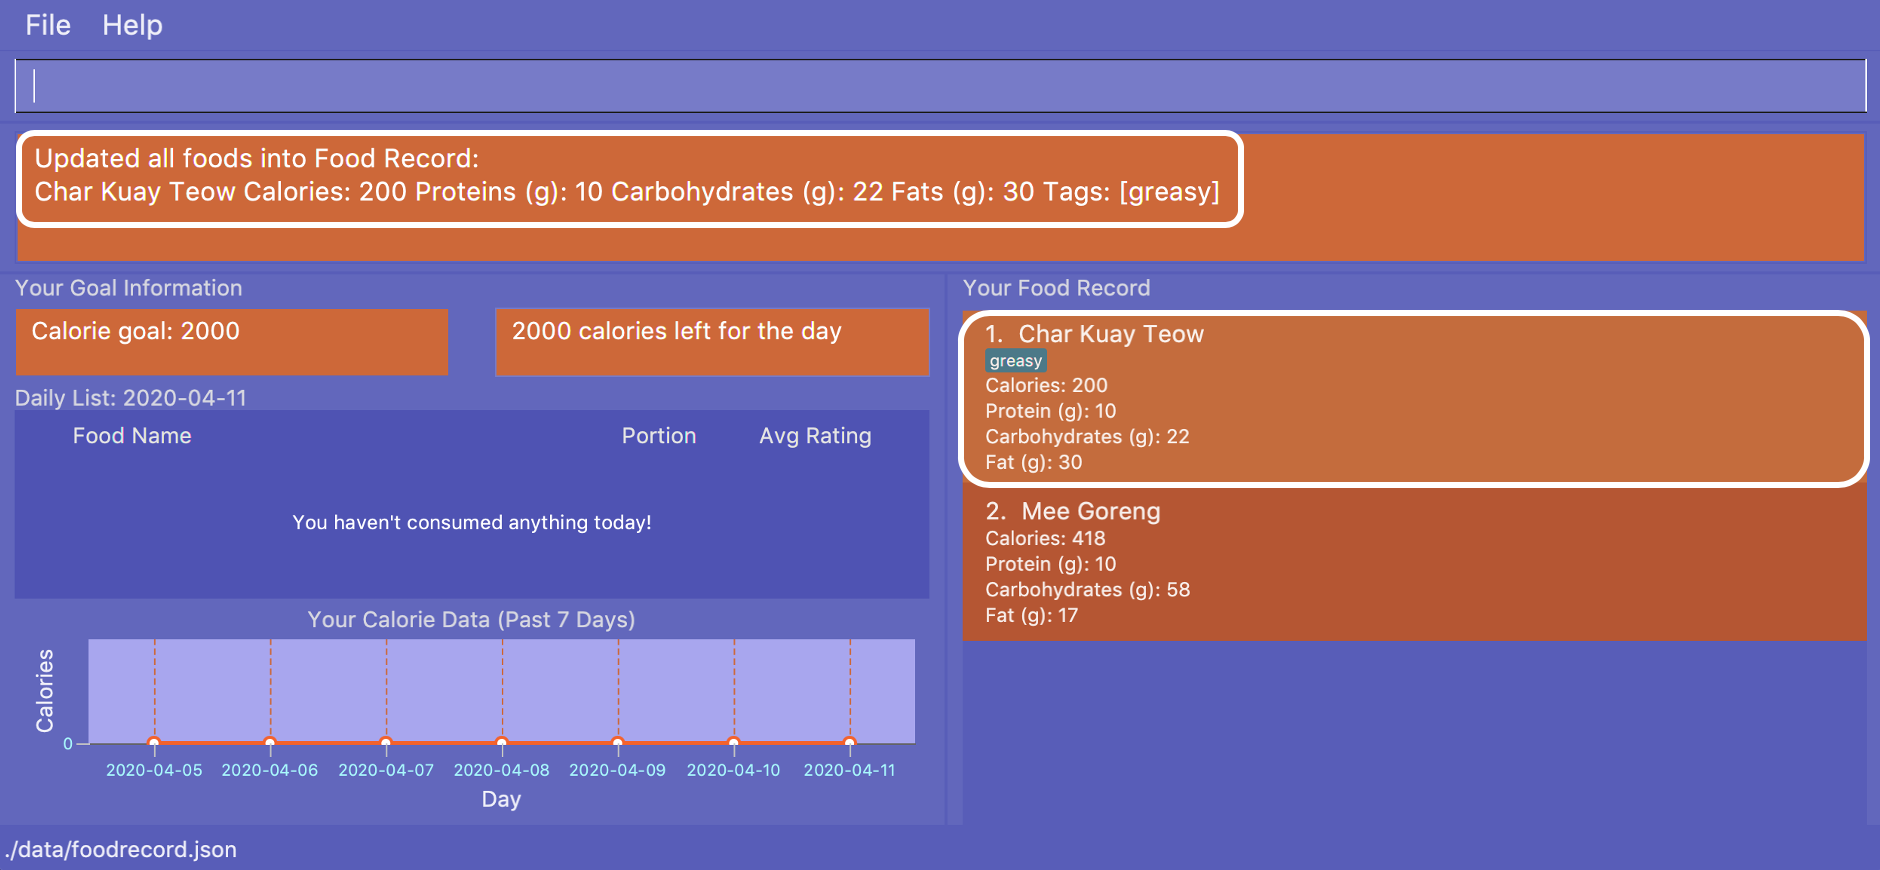
Calgo automatically formats the name of your Food for you to proper case. Hence, you
see that instead of a hideous "char KUay TeoW"
being updated into the Food Record, your new Food item is updated as "Char Kuay Teow".
5.13. vomit : Removing portions of Food from Consumption Record
(by Ruicong)
If you have overstated an amount previously (or actually vomited from over-consumption), you can amend existing
consumption records using the vomit command.
The Food that you wish to vomit must already exist in the current Consumption Record,
but not necessarily exist in the Food Record.
|
Format: vomit num/INDEX [d/DATE] [portion/PORTION]
Example: Let’s say you ordered a glass of Bandung and previously used nom with PORTION set to 1.
However, because the drink was too sweet, you only finished half a glass, you can use vomit to adjust your
Consumption Record. Here’s how you can do this:

You should enter vomit num/1 portion/0.5, then press enter.

As you can see from the Consumption Record panel, the portion has been reduced to 0.5.
The Graph Display also reflects a drop in calories.
6. FAQ
Q: How do I transfer my Calgo data to another Computer?
A: Install Calgo in a folder inside the target computer and copy over your current data folder into that folder.
Q: Where can I find my exported Food entries and consumption reports?
A: They are both found in the exports and reports subfolders in the data folder respectively. Please do not
remove the json files in the data folder. These are system files.
Q: How can I save the data I keyed into Calgo?
A: Calgo’s data is automatically saved into the computer after any command that changes the data. Manual saving isn’t needed.
7. Glossary
Case-insensitive: Upper-case letters and lower-case letters are treated in the same manner.
Command Line Interface (CLI): Text-based user interface used to view and manage computer files.
Command: Instruction to be performed by Calgo to achieve a desired result.
Consumption Record: GUI component that shows Food entries consumed on a particular day
Date: A specific day on the calendar.
Food Entry: A food item that contains name, amount of calories, total grams of protein, carbohydrate and fat. It can also contain optional tags.
Food Record: GUI component that shows Food entries and their respective nutritional information
Goal: Daily calorie goal set by the user.
Graphical User Interface (GUI): A visual interface by which users can interact with Calgo with.
Index: The number beside the name of the corresponding Food entry in the Consumption Record.
Nutritional Information: Refers to calories, proteins, carbohydrates and fats.
Portion: A number that describes the quantity of food
Prefix: A set of characters placed before a parameter when entering a command
Report: Refers to the document generated by the report command.
Result Display: A GUI Component that shows the outcome message after a command is executed.
Search Keyword: The user input to find matches for during a search.
Tag: A single word that describes a food item.
Proper Case: A format where words have all their first letters capitalised. (This Is An Example Of Proper Case).
8. Command Summary
| Command Category | Command Name | Function | Format | Example (if applicable) |
|---|---|---|---|---|
Navigate App |
Exit |
Exits the app. |
|
- |
Goal |
Sets your daily calorie goal. |
|
|
|
Help |
Displays a guide for all commands. Can also display only commands containing the given command word. |
|
|
|
Edit |
Clear |
Clears all |
|
- |
Delete |
Deletes the specified |
|
|
|
Update |
Updates a |
|
|
|
Navigate |
Find |
Searches through the Calgo’s |
|
|
List |
Displays all current entries inside the |
|
- |
|
Edit and Navigating |
Nom |
Adds a |
|
|
Stomach |
Displays all |
|
|
|
Vomit |
Deletes a specific |
|
|
|
Generate Document |
Report |
Generates consumption report for a given date. |
|
|
Export |
Generates a neat and editable file containing the current |
|
- |
Please note the following:
-
For the
clear,export, andlistcommands, any parameters entered will be ignored. -
For the
findcommand, only one parameter is accepted. Any input entered without a precedingPrefixwill be ignored. -
For commands that have date parameters, they are to be in the format YYYY-MM-DD.